

How to INCREASE WordPress Website Speed in Mobile for FREE
Welcome to part 4 in this training series on how to build a passive income from home.
Once again, we’ll be further optimizing our WordPress site today.
So if you remember in the last training, we optimized our WordPress website for SEO.
Today, you’ll see how to increase WordPress website speed in mobile for free.
Now when I say “increase WordPress speed”, I’m probably underselling it a tad…
In fact, I’m going to show you how to extract as much juice from your site as possible.
So by the time you’ve completed today’s training, your site should be super fast.
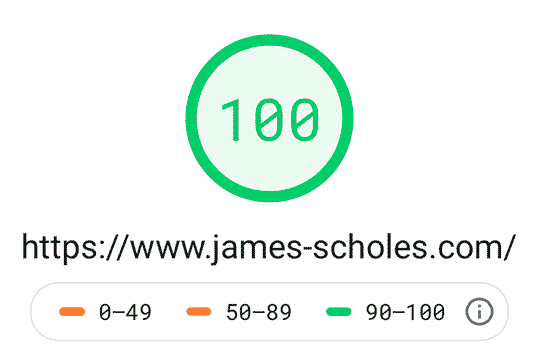
Also, you should also score anywhere from 90 – 100 on Google PageSpeed Insights too.

And just in case you’re wondering…
This will work for desktop as well as the mobile version of your WordPress site.
I only mention mobile because when you optimize for mobile, you optimize for desktop too.
Now There’s a Few Reasons Why You Want to Increase WordPress Website Speed in Mobile for Free…
The obvious one is that you’ll give a much better-end user experience.
If your site takes too long to load, people will simply back-page & go else where instead.
However, the second reason is far more important in my opinion…
And that is, Google rewards fast loading websites with better rankings in their search engine.
So the faster your WordPress site loads, the higher you’ll rank in Google search results.
Okay, so you can see how important this is and why you should do it…
So with that said, here’s how to increase WordPress website speed in mobile for free.
What You’ll Be Learning Today:
(Click any of the links below to jump to that part of the training)
-
- Watch training in video format
- Step 1. How to update PHP in Cpanel to the latest version
- Step 2. Automating images compression in Cpanel
- Step 3. Downloading and activating the WordPress plugins
- Step 4. Setting up & optimizing the Autoptimize WordPress plugin
- Step 5. Setting up & optimizing the FV Gravatar Cache WordPress plugin
- Step 6. Setting up & optimizing the Smush WordPress plugin
- Step 7. Setting up & optimizing the W3 Total Cache WordPress plugin
- Step 8. Setting up & optimizing your Cloudflare account
- Step 9. How to connect Cloudflare to W3 Total Cache WordPress plugin
Watch Training in Video Format
If you prefer to watch rather than reading, you can get this training in video format instead.
You can watch it here

Once you’ve completed this training, you can start the next module here:


If, however, you prefer to read, then you can do so here…
Step 1. How to Update PHP in Cpanel to the Latest Version
The first thing we need to do is to update the PHP to the latest version.
According to some studies, updating to the latest PHP version can reduce load times by 50%.
Its just a case of flicking a switch too, so it’s very easy to do.
To update to the latest PHP version for Cpanel, simply login to your Cpanel account.
You can do this by putting “/cpanel” after your domain in the URL browser.
So for example, if I wanted to login to my Cpanel, I would simply visit this URL:
https://www.James-Scholes.com/cpanel
Obviously, you would change my site for yours & that will take you to your Cpanel login page.
Anyway, once you’ve logged into your Cpanel, here’s how to update the PHP in Cpanel…
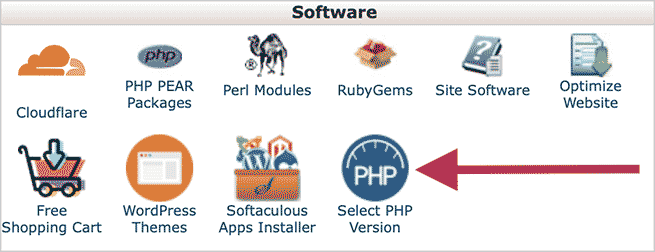
First up, head to the “Software” section then click on “Select PHP Version”:

Then on the “PHP Selector | Extension” page, select the latest PHP version here:
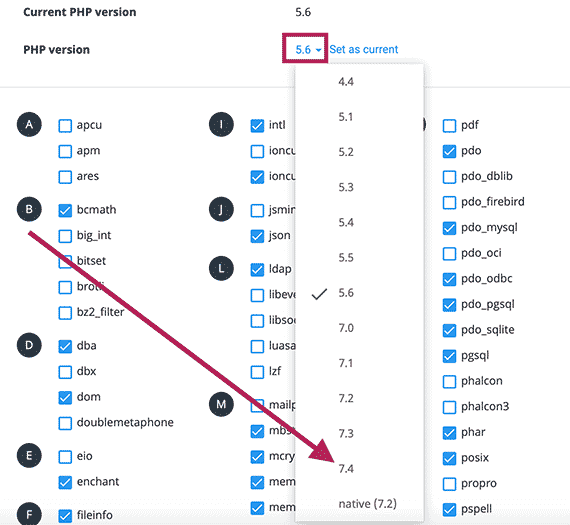

Then click on “Set as current”.
What I recommend you to do now is to check your site to see if it’s working probably.
All latest WordPress themes and plugins are designed to work with the latest PHP version.
However, you may have an old plugin or theme that hasn’t been updated for a while.
If that’s the case, then it may negatively affect your WordPress website.
So if your site is not working, then it looks like you’re using an old plugin or theme.
If so, head back to the “PHP Selector | Extension” page & try the previous PHP version.
Keep rinsing & repeating this until you’ve found a PHP version that works for your site.
That said, if your themes & plugins are regularly updated, the latest PHP should work.
Step 2. Automating Content Compression in Cpanel
Another trick you can do within Cpanel is to set it up so it compresses content automatically.
This will make the content on your site smaller & load them faster as a result.
To do this, head back to the “Software” section in Cpanel, then click on “Optimize Website”:


Select “Compress All Content” then click on “Update Settings”:
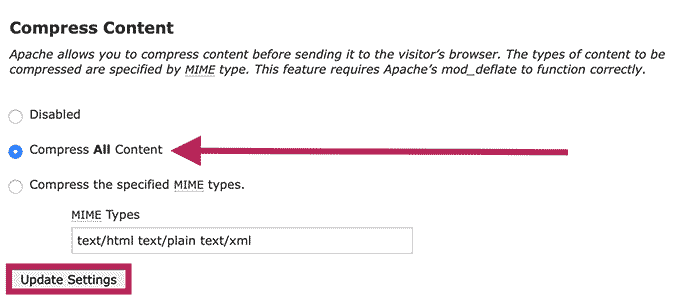

And that’s how to automatically compress content so your site loads faster.
Step 3. Downloading and Activating the WordPress Plugins
The next thing we need to do is to download all the plugins we’ll need to speed up your site.
All these WordPress plugins are 100% free to access and use by the way.
Now these are the free WordPress plugins we’ll be using for this part of the training:
-
- a3 Lazy Load
- FV Gravatar Cache
- Smush
- W3 Total Cache
- Autoptimize
To download and install them, first login to your WordPress Admin Dashboard.
Then head to “Plugins” then “Add New”:
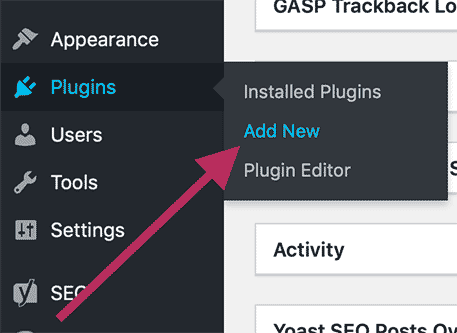

What we do now is copy one of the plugins names above & paste it into the search bar like so:
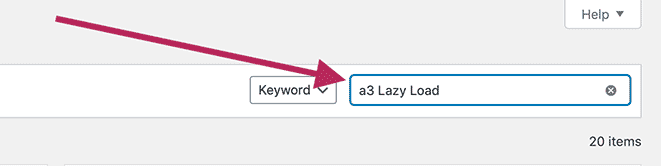

When the plugin appears in the search results, click “Install Now”.
Then do the same for the remaining four plugins.
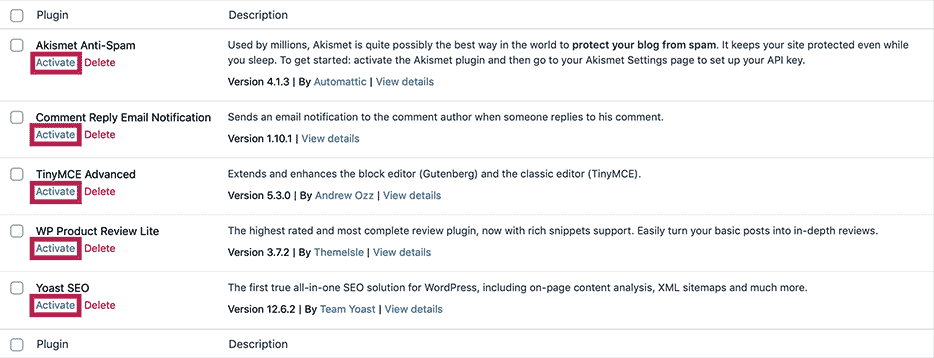
We then go to “Plugins” & then “activate” all the WordPress plugins.

Once you’ve done that, I’ll see you in the next step…
Step 4. Setting up & Optimizing the Autoptimize WordPress Plugin
Autoptimize WordPress plugin basically optimizes & minifies the files on your website,
So as you can imagine, this will make your files lighter & load faster as a result.
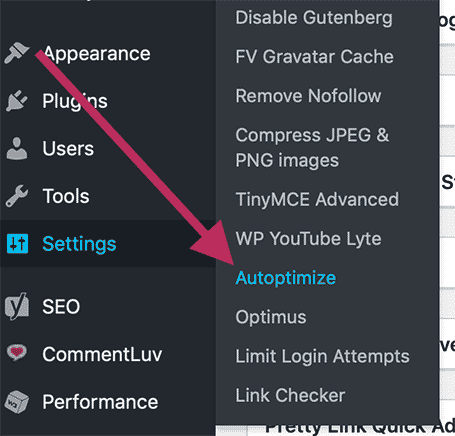
To optimize Autoptimize, head to “Settings” then “Autoptimize”:

What you need to do now is to apply the following settings…
Autoptimize Settings: JavaScript Options


-
- Optimize JavaScript Code?: Enable
- Aggregate JS-files?: Enable
- Also aggregate inline JS?: Disable
- Force JavaScript in <head>?: Disable
- Exclude scripts from Autoptimize: seal.js, js/jquery/jquery.js
- Add try-catch wrapping?: Disable
Autoptimize Settings: CSS Option

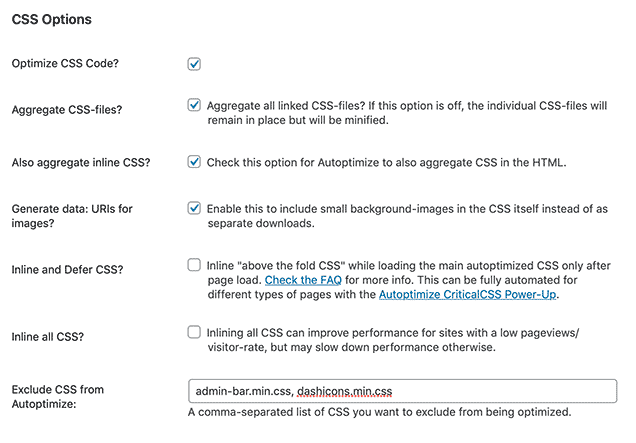
-
- Optimize CSS Code?: Enable
- Aggregate CSS-files?: Enable
- Also aggregate inline CSS?: Enable
- Generate data: URIs for images?: Enable
- Inline and Defer CSS?: Disable
- Inline all CSS?: Disable
- Exclude CSS from Autoptimize: admin-bar.min.css, dashicons.min.css
Autoptimize Settings: HTML Options
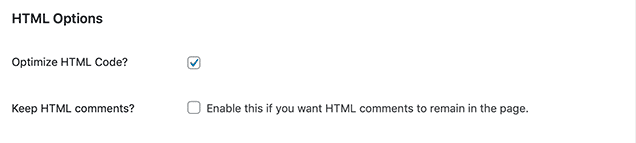

-
- Optimize HTML Code?: Enable
- Keep HTML comments?: Disable
Autoptimize Settings: CDN Options
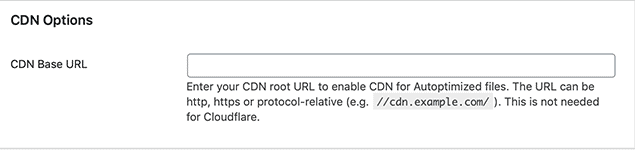

-
- CDN Base URL: Leave blank
Autoptimize Settings: Misc Options
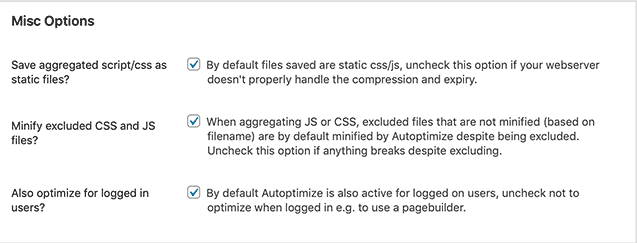

-
- Save aggregated script/css as static files?: Enable
- Minify excluded CSS and JS files?: Enable
- Also optimize for logged in users?: Enable
Once you’ve done that, then press “Save Changes and Empty Cache”.
Then head to the “Extras” tab & apply the following settings for Autoptimize…
Autoptimize Settings: Extra Auto-Optimizations
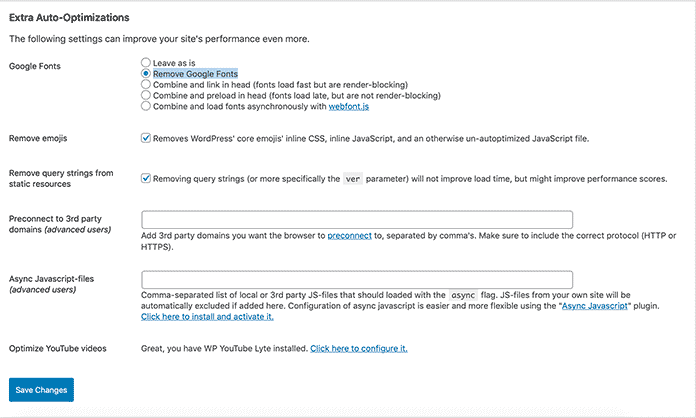

-
- Google Fonts: Remove Google Fonts
- Remove emojis: Enable
- Remove query strings from static resources: Enable
- Preconnect to 3rd party domains (advanced users): Leave blank
- Async Javascript-files (advanced users): Leave blank
…And that’s it, that’s how you optimize the settings for Autoptimize for optimal performance.
Step 5. Setting up & Optimizing the FV Gravatar Cache WordPress Plugin
If your site gets lots of comments, then FV Gravatar Cache is essential for speeding up your site.
Here’s why…
Every comment that uses Gravatar, your site has to load the image from an external server.
Believe it or not, this really slows down the the load time of your WordPress site.
Also, the more comments that use Gravatar, the slower the page takes to load too.
What FV Gravatar Cache plugin does is moves all the images from the Gravatar site to yours.
This drastically increases WordPress Website Speed in Mobile & desktop versions of your site.
Plus, you get to further optimize the Gravatar images once they’re on your server too.
This will make the Gravatar images even lighter and make them load faster on your site.
Here’s how to setup FV Gravatar Cache Wordpress plugin anyway…
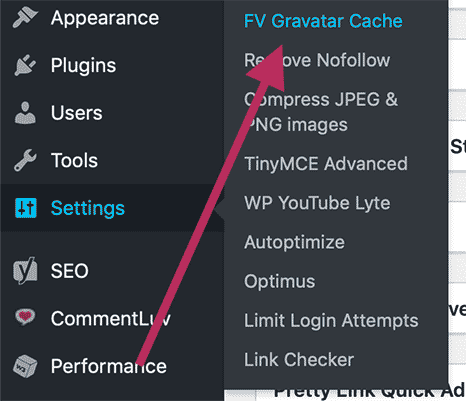
First, head to “Settings” then “FV Gravatar Cache”:

Now there isn’t a lot to setup when it comes to FV Gravatar Cache Wordpress plugin.
In fact, there’s only two settings you need to configure.
These being “Gravatar size” and “Daily cron”:


FV Gravatar Cache Settings: Gravatar Size
The Gravatar Size setting basically dictates how optimized you want the Gravatar image to be.
So the lower the number, the faster the the image will load.
Just keep in mind, the lower the number, the the more blurrier the Gravatar image becomes.
-
- Recommended Setting: 50
FV Gravatar Cache Settings: Daily Cron
When activated, the Daily Cron will automatically scan your site for new comments to cache.
This is great if you’re getting multiple comments a day as it’ll automate the process for you.
However, it can be server intensive which can slow down your site.
If you’ve got a smaller site that doesn’t get as many comments, then I’d opt to do this manually.
To do this manually, you just press “Run Cron Now” button at the bottom of the page.
-
- Recommended Setting: Enable if you get one or more comments a day.
Once you’ve chosen the settings best suited for your site, then press “Save Changes”.
And that’s how to setup FV Gravatar Cache WordPress plugin for best performance.
Step 6. Setting up & Optimizing the Smush WordPress Plugin
One way on How to increase WordPress Website Speed in Mobile for free is optimizing images.
Me personally, I like to optimize images manually which I’ll be touching on later in this series.
However, there’s a quicker, easier & completely automated way of doing this too.
To do this, we’ll be using the free WordPress plugin we downloaded earlier called Smush.
So head to “Smush” on the sidebar and click “Dashboard”.
When in the main “Bulk Smush” page, scroll down to “Settings” & apply the following settings:
Smush Settings: Image Sizes
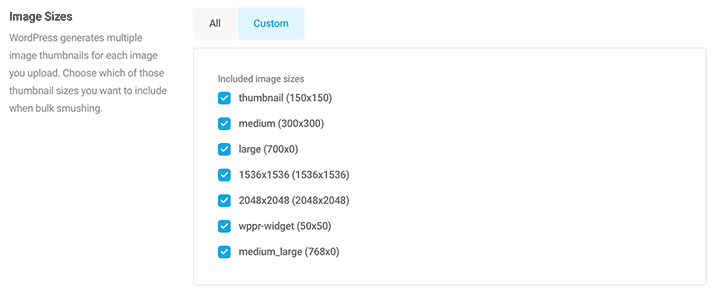

-
- thumbnail: on
- Medium: on
- Large: on
- 1536×1536: on
- 2048×2048: on
- Wppr-widget: on
- Medium_large: on
Smush Settings: Automatic Compression


-
- Automatically smush my images on upload: on
Smush Settings: Metadata


-
- Strip my image metadata: on
Smush Settings: Image Resizing
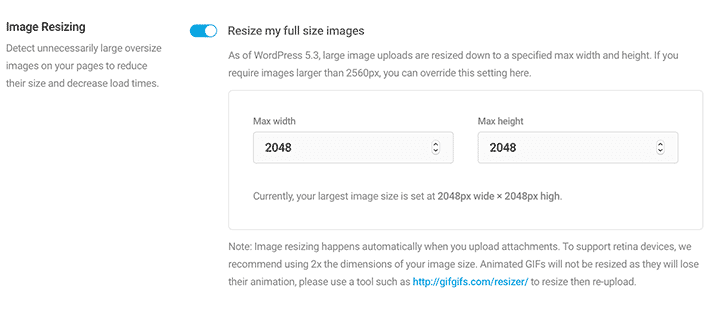

-
- Resize my full size images: on
Once you’ve made the above changes, then click “SAVE CHANGES” and we’re done.
Step 7. Setting up & Optimizing the W3 Total Cache WordPress Plugin
Another way on how increase WordPress Website Speed in Mobile for free is caching.
If you don’t know what caching is, it basically stores your site’s data onto your visitor’s device.
The end result is that load times are significantly faster from the second visit onwards.
So to cache your site, we’ll be using the W3 Total Cache WordPress Plugin we downloaded.
W3 Total Cache is a powerful plugin but it can be overwhelming for first time users.
Thankfully, I’m here to break everything down & walk you through the entire process.
So with that said, here’s how to setup W3 Total Cache WordPress Plugin for your site…
First up, go to “Performance” in the sidebar then “General Settings”.
Now apply the following settings…
W3 Total Cache Settings: Page Cache


-
- Page Cache: Enabled
- Page Cache Method: Disk: Enhanced
W3 Total Cache Settings: Minify
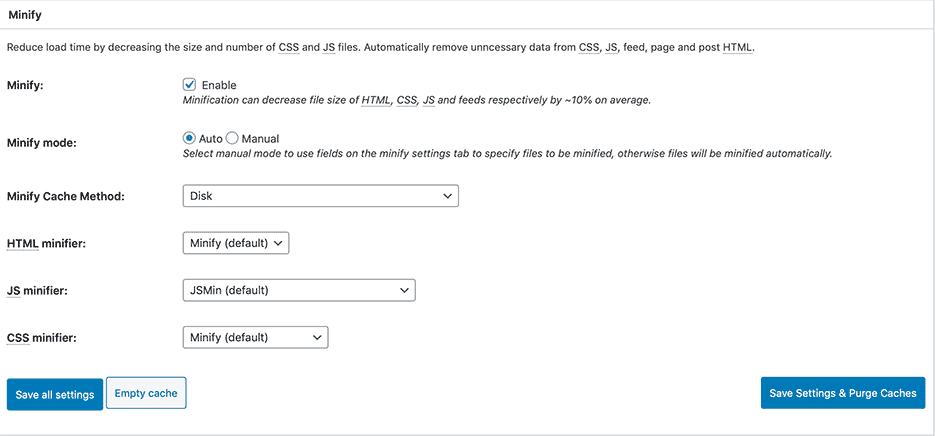

-
- Minify: Enable
- Minify mode: Auto
- Minify Cache Method: Disk
- HTML minifier: Minify (Default)
- JS minifier: JS (Default)
- CSS minifier: CSS (Default)
W3 Total Cache Settings: Opcode Cache
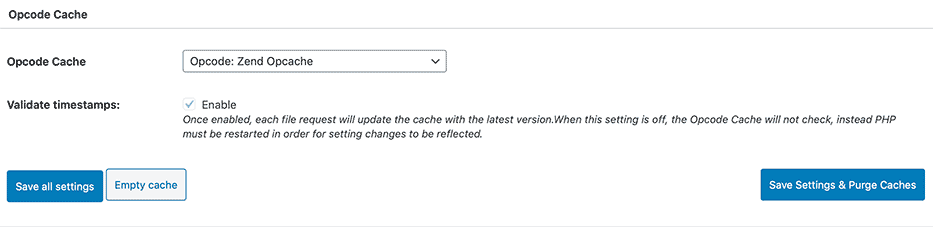

-
- Opcode Cache: Zend Opcache
- Validate timestamps: Enable
W3 Total Cache Settings: Databas Cache
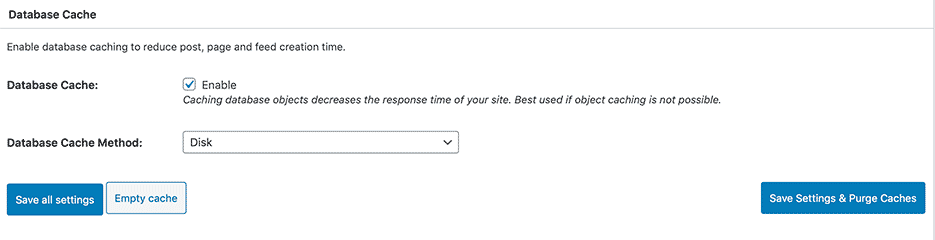

-
- Database Cache: Enable
- Database Cache Method: Disk
W3 Total Cache Settings: Object Cache


-
- Object Cache: Enable
- Object Cache Method: Disk
W3 Total Cache Settings: Browser Cache
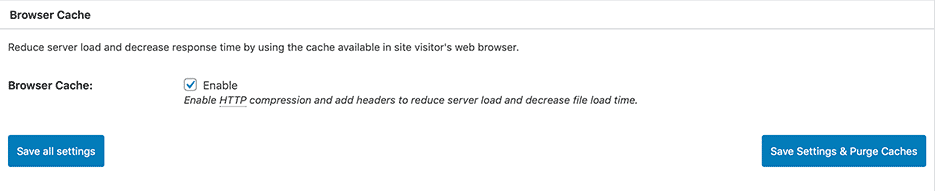

-
- Browser Cache: Enable
W3 Total Cache Settings: CDN
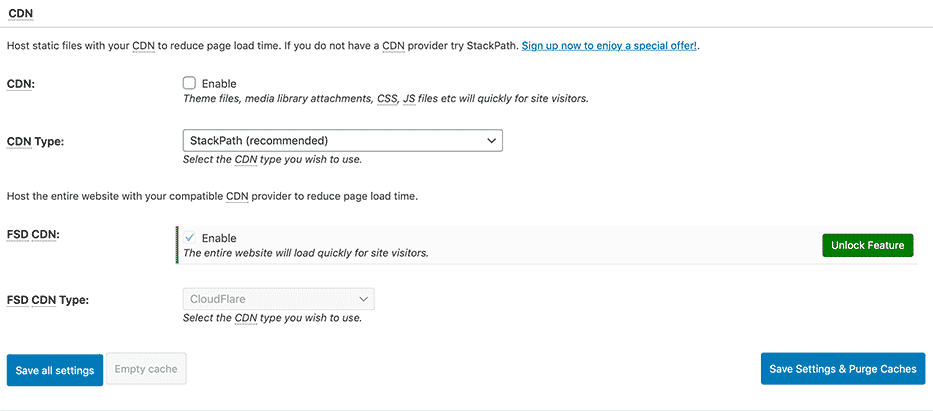

-
- CDN: Untick
- CDN Type: Choose any, it doesn’t matter because we won’t be using any of them.
- FSD CDN: Enable
- FSD CDN: Cloudflare (you won’t be able to select until later in the training)
Once you’ve made those changes in “General Settings” then click Save all settings”.
Then go to “Page Cache” under the “Performance” settings.
Now starting from the General” box, apply the following settings…
W3 Total Cache Settings: General
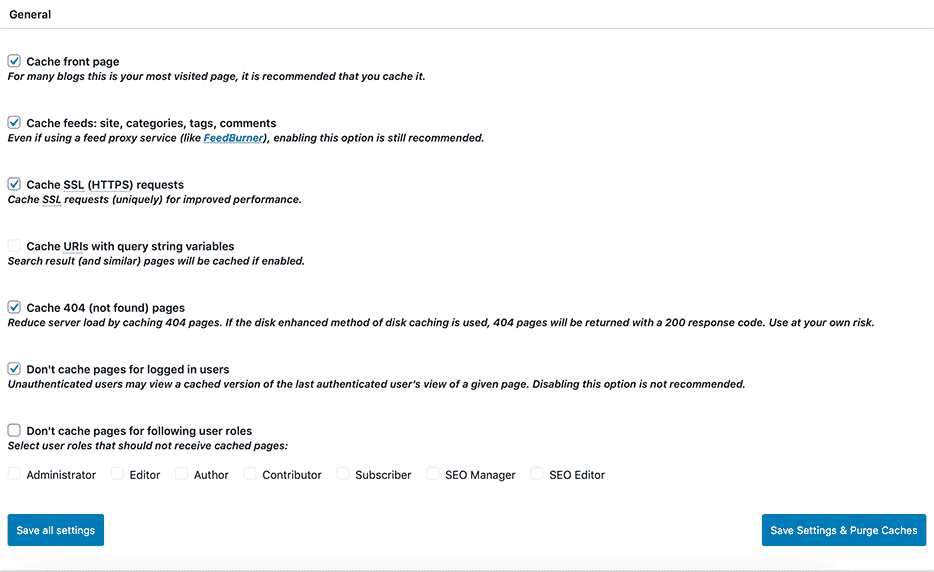

-
- Cache front page: Tick
- Cache feeds: site, categories, tags, comments: Tick
- Cache SSL (HTTPS) requests: Tick
- Cache URIs with query string variables: Untick
- Cache 404 (not found) pages: Tick
- Don’t cache pages for logged in users: Tick
- Don’t cache pages for following user roles: Untick
W3 Total Cache Settings: Cache Period
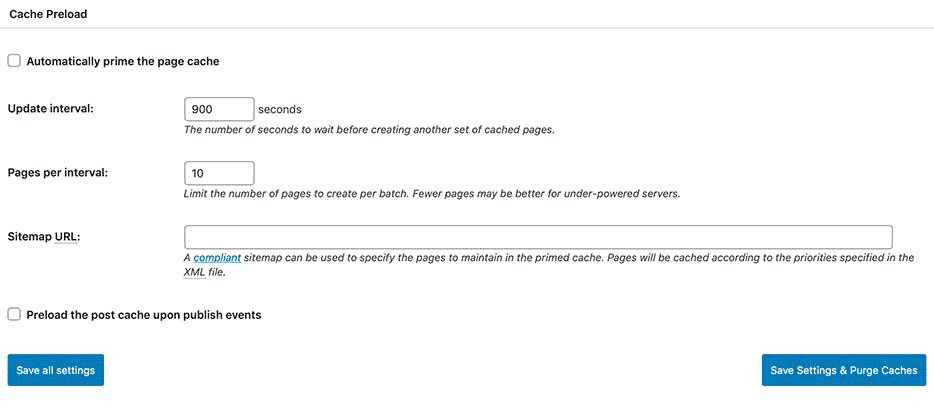

-
- Automatically prime the page cache: Untick
- Update interval: 900
- Pages per interval: 10
- Sitemap URL: Enter your sitemap URL here
- Preload the post cache upon publish events: Untick
You can ignore everything else on the “Cache Period” page & press “Save all settings”.
Now head to the next tab, the “Minify” page & apply the following settings…
W3 Total Cache Settings: General
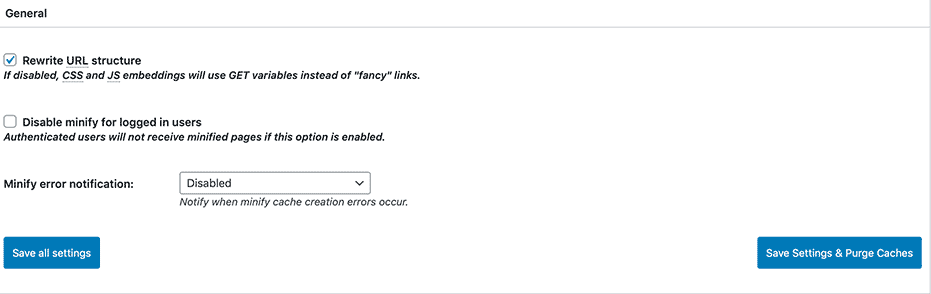

-
- Rewrite URL structure: Tick
- Disable minify for logged in users: Untick
- Minify error notification: Disabled
W3 Total Cache Settings: HTML & XML
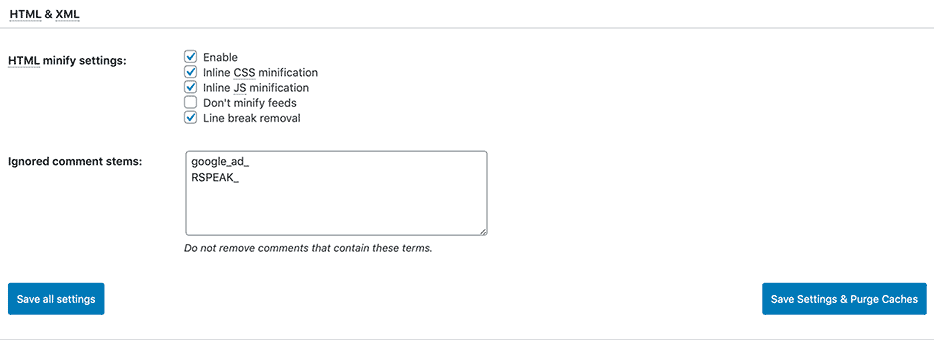

-
- HTML minify settings
- Enable: Tick
- Inline CSS minification: Tick
- Inline JS minification: Tick
- Don’t minify feeds Untick
- Line break removal Tick
- Ignored comment stems: google_ad_ RSPEAK_
W3 Total Cache Settings: JS
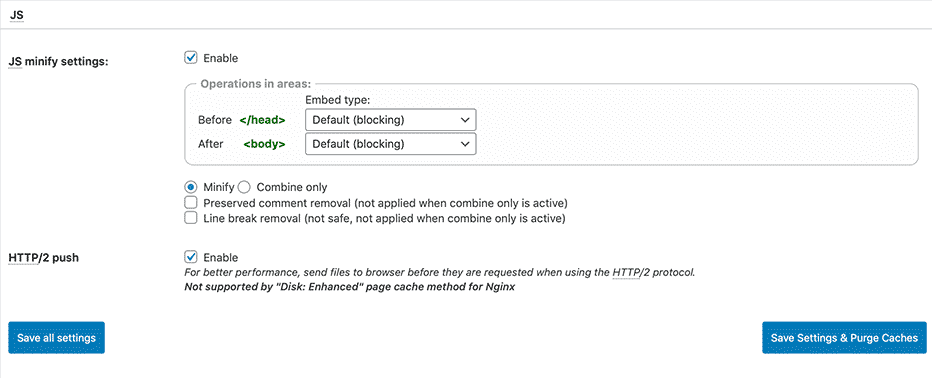

-
- JS minify settings: Enable
- Minify: Tick
- Preserved comment removal: Untick
- Line break removal: Untick
- HTTP/2 push: Enable
W3 Total Cache Settings: CSS
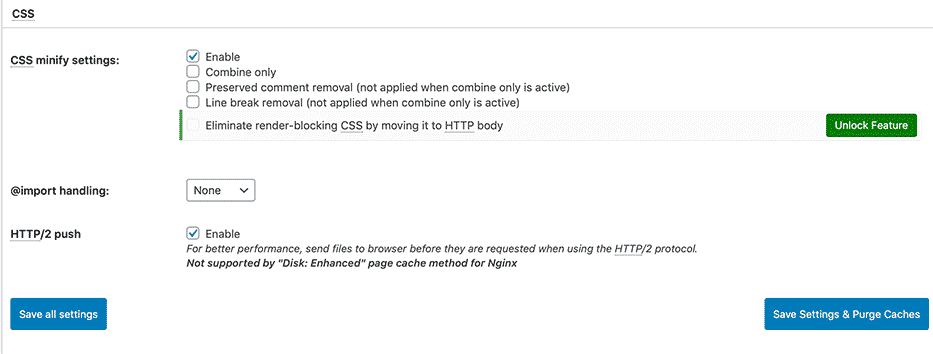

-
- CSS minify settings: Enable
- @import handling: None
- HTTP/2 push: Enable
Once you’ve made these changes, ignore the rest & press “Save all settings”.
The next one we need to configure is the “Browser Cache” in the “Performance” section.
Once you’re there, make the following changes…
W3 Total Cache Settings: General
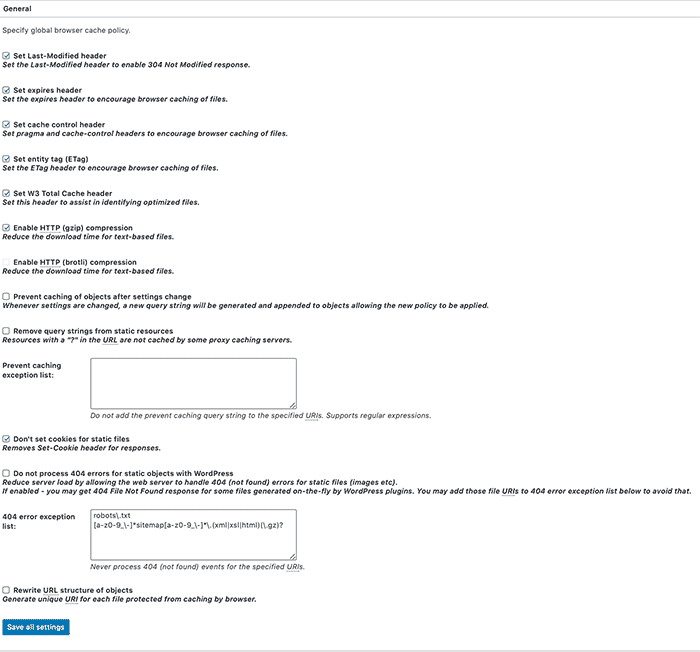

-
- Set Last-Modified header: Tick
- Prevent caching exception list::
- 404 error exception list: robots\.txt [a-z0-9_\-]*sitemap[a-z0-9_\-]*\.(xml|xsl|html)(\.gz)?
- Rewrite URL structure of objects:
W3 Total Cache Settings: CSS & JS
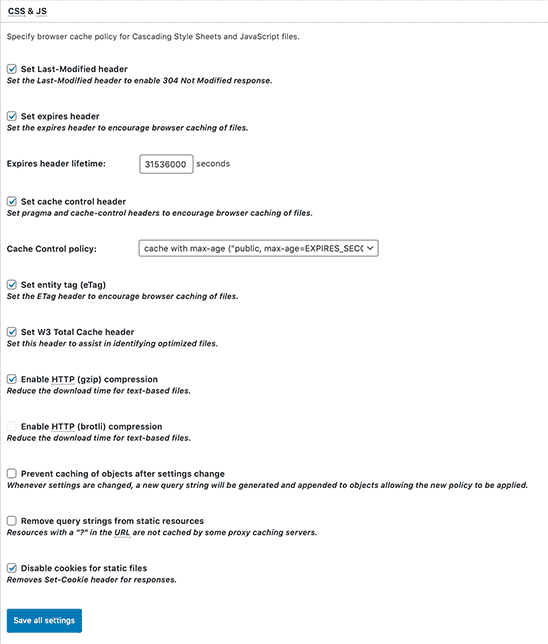

-
- Set Last-Modified header: Tick
- Expires header lifetime: 31536000
- Cache Control policy: cache with max-age
- Enable HTTP (gzip) compression: Tick
- Enable HTTP (broli) compression: Untick
W3 Total Cache Settings: HTML & XML
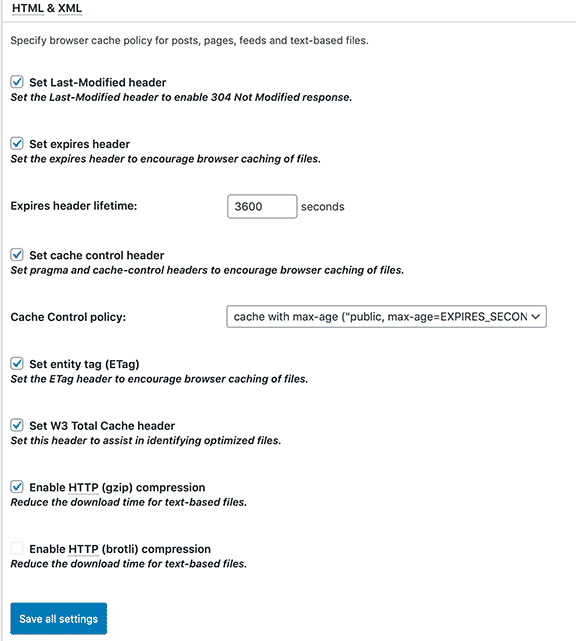

-
- Set Last-Modified header: Tick
- Expires header lifetime: 3600
- Cache Control policy: cache with max-age
W3 Total Cache Settings: Media & Other Files
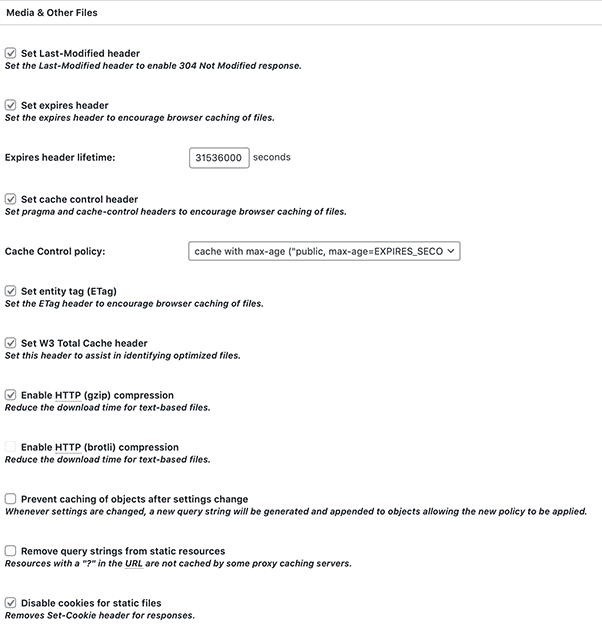

-
- Expires header lifetime: 31536000
- Cache Control policy: cache with max-age
- Set W3 Total Cache header: Untick
- Enable HTTP (gzip) compression:
- Enable HTTP (brotli) compression: Untick
Once you’ve made these changes, ignore the rest & press “Save all settings”.
You’re now ready for the next step in this training…
Step 8. Setting up & Optimizing your Cloudflare Account
Another way on how increase WordPress Website Speed in Mobile for free is to use a CDN.
CDN stands for ‘Content Delivery Network’ & what it does is caches your site on their servers.
So why do you want to use a CDN and have your website cached on their servers?
Well here’s why…
They have multiple servers placed around the world & your site will be cached on all of them.
The benefit to this is that your site will load from the server located nearest to your visitor.
This results in your site loading a lot faster than just relying on your own server to load your site.
So regardless where your visitors are located, your site should load fast every time.
now the CDN we’ll be using is called Cloudflare and it’s 100% free to setup and use too.
Also, they apparently have over a hundred data-centers dotted around the world too.
So regardless where your visitors are located, your site should load fast every time.
Anyway, the first thing we need to do is to setup an account over at Cloudflare.
You can sign up for free here:
Once you’ve created your Cloudflare account, click “Add site”:
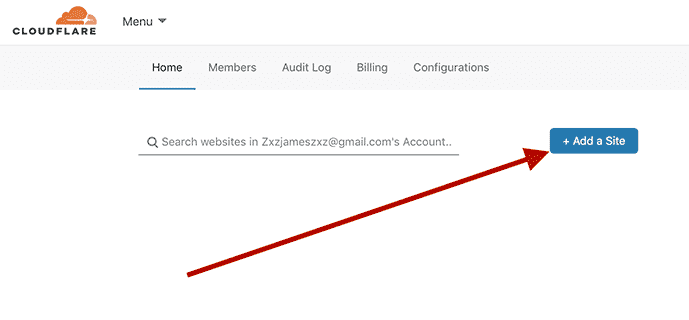

Enter your site’s URL and click on “Add site”.
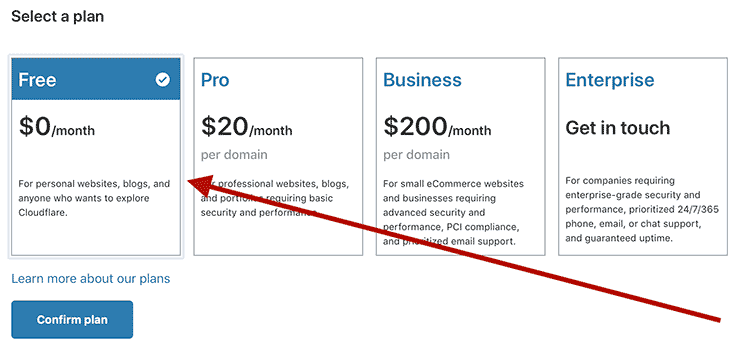
Then use the free plan and click “Confirm plan”:

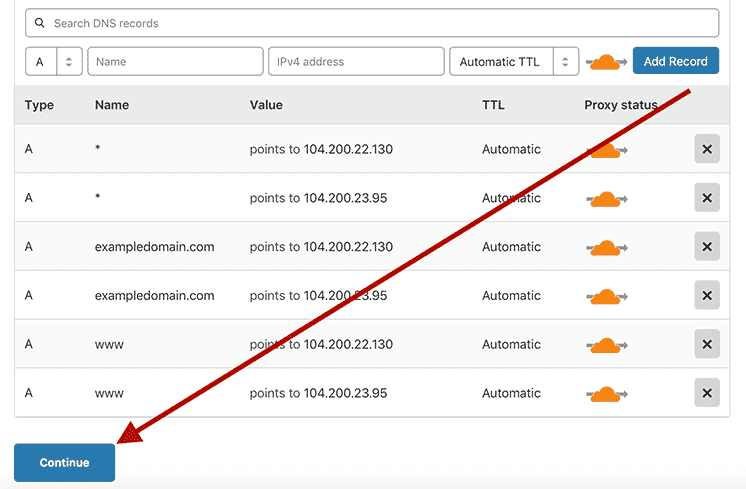
Here you can review your DNS records.
There’s nothing you need to do here, so just scroll down and click “Continue”:

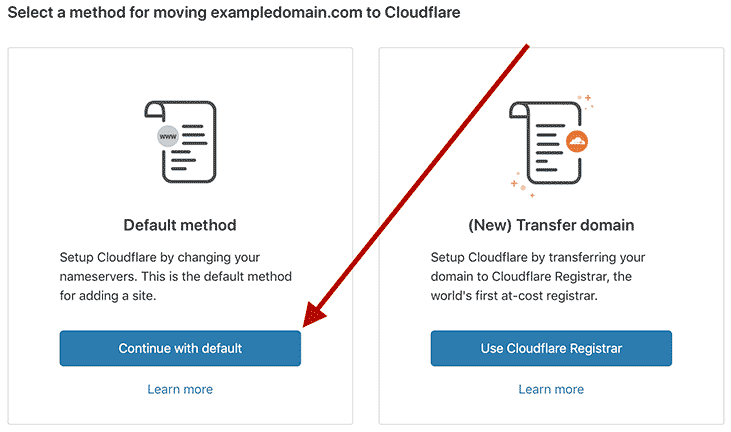
This will take you to a page where you can choose how to connect your site to Cloudflare.
I recommend choosing the “Default method” as it only involves changing the nameservers.
So click on “Continue with default”:

On the next page, you can get your new nameservers which are located here:
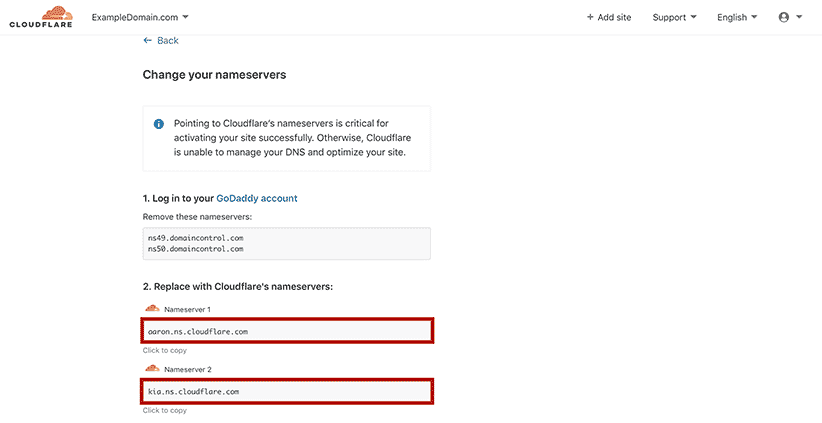

Then go to your domain registrar and update your nameservers to the new ones.
If you’re unsure how to do this, I show you how to do this with D9 Hosting here.
Once you’ve done that, it should take Cloudflare up to 48 hours to take affect.
While you’re waiting for that to kick in, you can implement the final step in this training…
Step 9. How to Connect Cloudflare to W3 Total Cache WordPress Plugin
What we need to do now is to connect Cloudflare to W3 Total Cache WordPress Plugin.
To do that, head back to WordPress Admin Dashboard.
Then head to “Performance” then go to “Extension”:
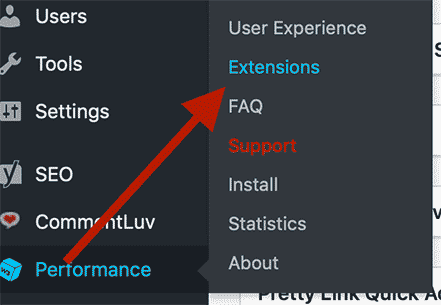

Then locate the Cloudflare extension and click on”Activate”.
Once you’ve clicked on “Activate”, the “Settings” will appear in its place.
All we do then is click on the “Settings” link to go to the Settings page.
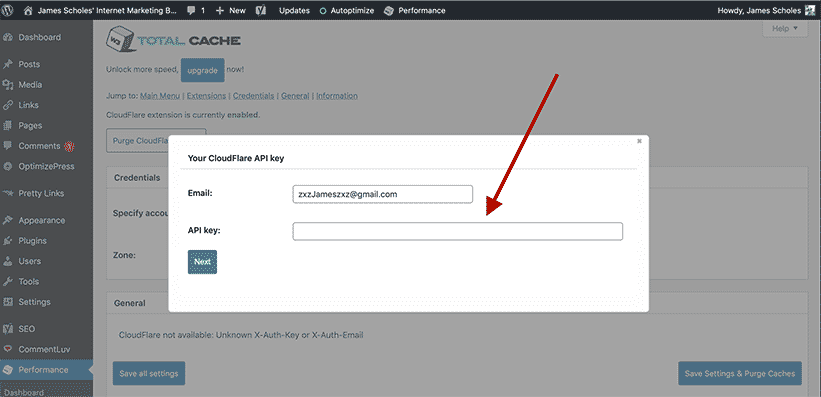
Under the “Credentials” section, click on “Activate”.
A popup will appear, asking for your email and Cloudflare API key:
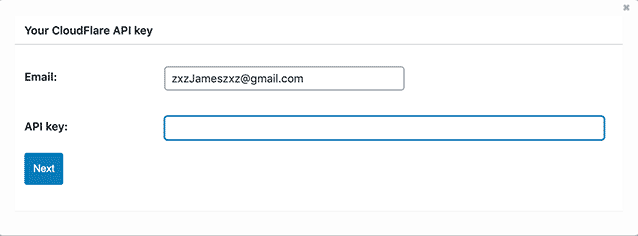

Enter your email & for your Cloudflare API key, we need to login to your Cloudflare account.
Once you’ve logged in, select your site from the dropdown menu.
This should take you to the “Overview” tab.
Then scroll down to the bottom of the page and click the “Get your API Token”:


Once again, scroll down to the bottom & click on “View” in the “Global API Key” section:
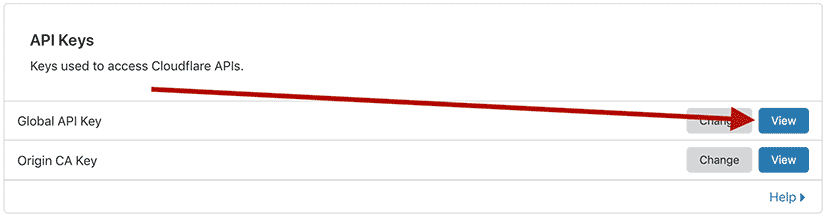

The API Key popup will appear.
Enter your Cloudflare password then click “View”.
Copy your API key & paste it into the “Your Cloudflare API key” box in WordPress:

Click “Next” then select your website and press “Next” again.
We’ve now connected our Cloudflare account to the W3 Total Cache WordPress Plugin.
We now need to configure the following settings…
CloudFlare: Content Processing
===IMAGE HERE===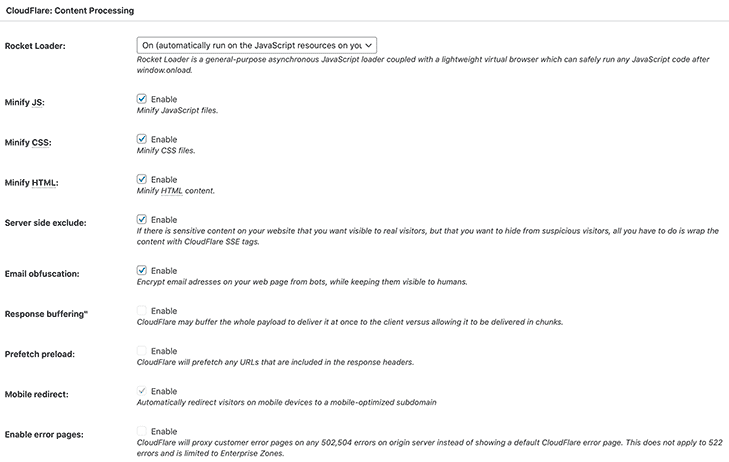

-
- Rocket Loader: On (automatically run on the Javascript resources on your site)
- Minify JS: Enable
- Minify CSS: Enable
- Minify HTML: Enable
- Server side exclude: Enable
- Email obtuscation: Enable
- Response buffering: Disable
- Prefetch preload: Disable
- Mobile redirect: Enable
- Enable error pages: Disable
Once you’ve done that, then click “Save CloudFlare settings” to save your new settings.
And that’s it…
That’s How to INCREASE WordPress Website Speed in Mobile for FREE
After completing this training, you should be scoring 90 – 100 on Google PageSeed Insights.
if you’re not, then it’s most likely a theme or a plugin I didn’t recommend in this training series.
If that’s the case, I recommend finding faster loading alternatives.
They’re out there, you’ve just got dig around for them, that’s all.
Anyway, I really hope you enjoyed today’s free training…
In my next training, I’ll be showing you how to do keyword research using free methods.
You can start the next part in this training series here:
You’ll see how to find easy to rank for keywords that gets lots of daily traffic.
So yeah, make sure not to miss out on that when I post it right here on my blog.
If you want to be notified when it’s ready, then subscribe to my newsletter here.
That way, when it’s ready, you’ll be the first to know & get instant access to it for free.
Plus, you’ll get my new” $688 a day” course absolutely free too.
Anyway, if you’ve got any questions on speeding up your site, let me know down below…
I’m more than happy to answer your questions & help you get the results you’re after.
Also, share your Google PageSpeed Insights score in the comment section too.
I would love to see them and help you improve them if you’re not hitting 90 or better.
And if you know any additional speed boosting tricks, I’d love to hear them too.
I’m always looking for new ways of squeezing as much juice from my site as possible.
Anyway, I’ll leave it at that…
Thanks for reading and I’ll see you in the next part in this training series soon…
James Scholes


How to INCREASE WordPress Website Speed in Mobile for FREE
Hi James,
This really worked for me, although I had issues with having all the plugins you listed here installed instantly. My dashboard was suggesting I delete some and I had to. But having autoptimize and W3 Total Cache installed got my page speed, which was initially at 45 to 81.
Thank you so much for sharing. I love the course training and I’m still taking them one after the other.
That’s awesome to hear you’re getting results with this training, Esy 🙂
If you want to speed up your site even faster for mobile users – and rank higher in Google search for mobile users due to faster loading speeds – then I recommend watching the second video in this post:
https://www.james-scholes.com/wordpress-speed-optimization-course-free/
You don’t need to watch the first video by the way as it’s the exact same one in this post you’ve just gone through.
Keep up the good work anyway.
James Scholes