How to Optimize a WordPress Website for SEO & Boost Rankings INSTANTLY
Welcome back to part 3 in this training series on how to make money online with blogging.
In part 2, I showed you how to install WordPress with Cpanel using Softaculous.
Today, we’ll be working on our WordPress site and optimizing it for optimal performance.
So what exactly are we optimizing it for, I hear you ask?
Well, I’m going to show you how to optimize your WordPress website for seo.
So when you implement this, you should get first-page Google rankings from the get-go.
Now a Quick Heads Up…
This is going to be a BIG post because we’ll be covering a lot today.
Yes, we’ll be going into detail with WordPress SEO but we’ll be touching on other aspects too.
These other aspects will make your site legally compliant & more secure by the way.
So make sure to bookmark this post if you’re unable to go through it all today.
Anyway, here’s how to optimize a WordPress website for seo & boost your rankings…
What You’ll Be Learning Today:
(Click any of the links below to jump to that part of the training)
-
- Watch training in video format
- Step 1. Cleaning up and How to Setup Permalink settings for SEO
- Step 2. Choosing and setting up your WordPress theme for SEO
- Step 3. Setting up legal and contact pages for your site
- Step 4. How to setup menus in the correct manner
- Step 5. Downloading and installing free WordPress plugins for SEO
- Step 6. How to setup Akismet and optimize Yoast SEO plugins
- Step 7. Naming your site and setting up a free Gravatar profile
- Step 8. How to add a bio box to your WordPress site
- Step 9. How to connect your WordPress site to Google Search Console
- Step 10. How to submit your sitemap to Google Search Console
Watch Training in Video Format
If you prefer to watch rather than reading, you can get this training in video format instead.
You can watch it here:
![SEO for Beginners: How to Rank Your Website on the FIRST Page using FREE WordPress Plugins [PART 3]](https://i.ytimg.com/vi/s4iHKZmlBVQ/0.jpg)
Once you’ve completed this training, you can start the next module here:

If, however, you prefer to read, then you can do so here…
Step 1. Cleaning up and How to Setup Permalink settings for SEO
After showing you how to install WordPress in my last post, you should have received an email.
This email will have all your login details you need to access your WordPress site.
Locate that email, click on the link and login to the WordPress Admin Dashboard.
The first thing I like to do is to close all the non essential notification boxes.
You can do this by clicking on the dropdown arrow/s here:

Obviously, keep the ones open if you need regular updates on that particular option.
I just find it helps as you’ll no longer get info-overload every time you login to your site.
The next thing we need to do is to remove all the examples as they’re not needed.
So head to “Posts” then delete the “Hello World” post:
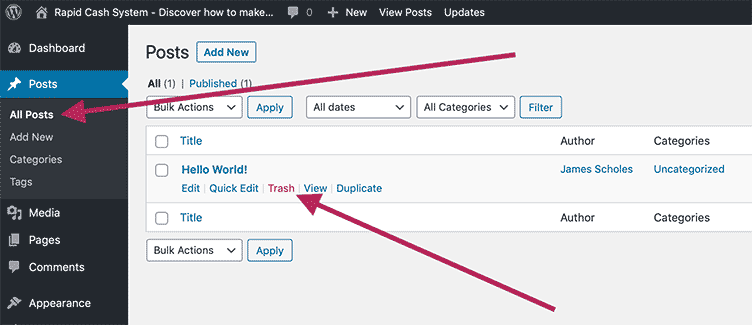
Then head to “Pages” then delete “Privacy Policy” and “Sample Page”:

We now need to optimize the structure of your URL in the Permalink settings.
This will make your links cleaner & it’ll help with SEO as it’ll have your keyword in the URL too.
To do this, head to “Settings” then “Permalinks”:
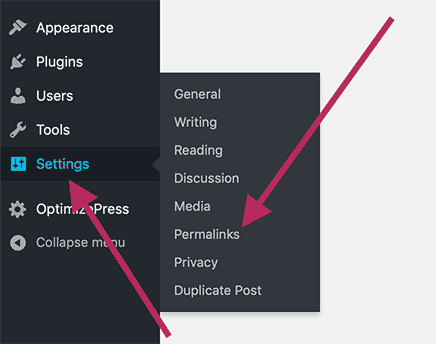
Once in the “Permalink Settings”, you then need to select “Post name”:

Then scroll to the bottom of the page & click on “Save Changes”.
After doing that, you’re now ready for the next stage…
Step 2. Choosing and Setting up your WordPress Theme for SEO
What we need to do is to find a SEO friendly WordPress theme for your site.
If you don’t know what a theme is, it basically dictates the look & function of your site.
So you can have your site to look any way you want, all without any coding whatsoever.
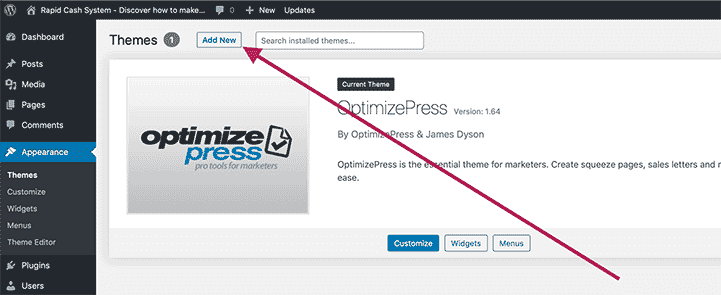
To do this, we first need to head to the “Theme” section.
To get there, go to “Appearance” then “Themes”:
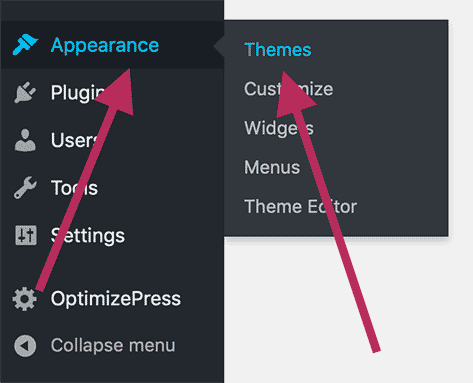
Once you’re at the theme page, then click “Add New”:
Now there’s a few options WordPress gives you when finding a theme for your site:

Here’s a brief rundown on what they mean:
-
- Featured: themes that WordPress is promoting for that particular day.
- Popular: Wordpress themes that have been downloaded and installed the most.
- Latest: the newest WordPress themes to hit the market.
- Favorite: these are ones you’ve favorited earlier. I’d skip this if this is your first time.
- Feature Filter: find the exact type of theme you want by searching for design features.
If you’re not sure where to begin, then start with “Featured” & “Popular” tabs first.
I tend to find this is where the best themes are located – especially the “Popular” tab.
So starting with the “Featured” tab, hover your mouse over the first theme.
Then click on “Preview”:
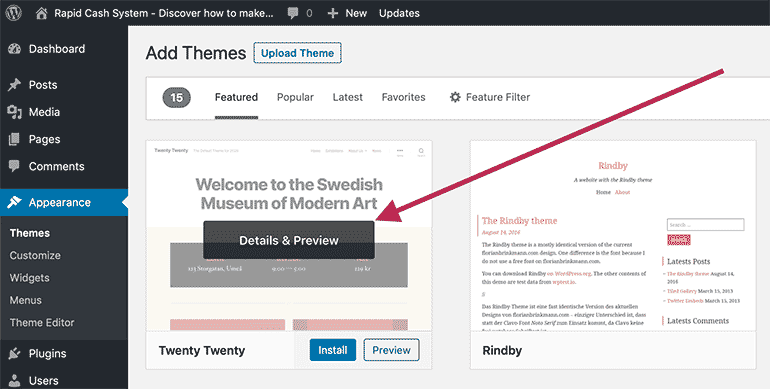
This will give you a demo of what your site will look like using this particular theme.
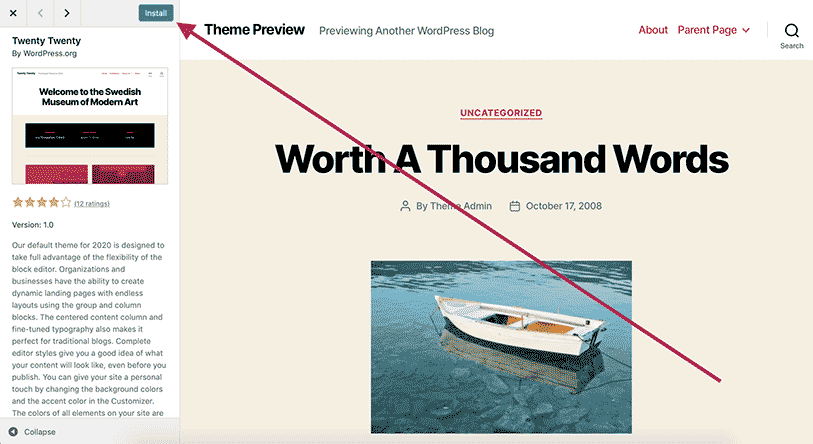
If you like this WordPress theme, then click “Install”:
If you don’t like it, then click on the “Next” arrow to view the next theme:
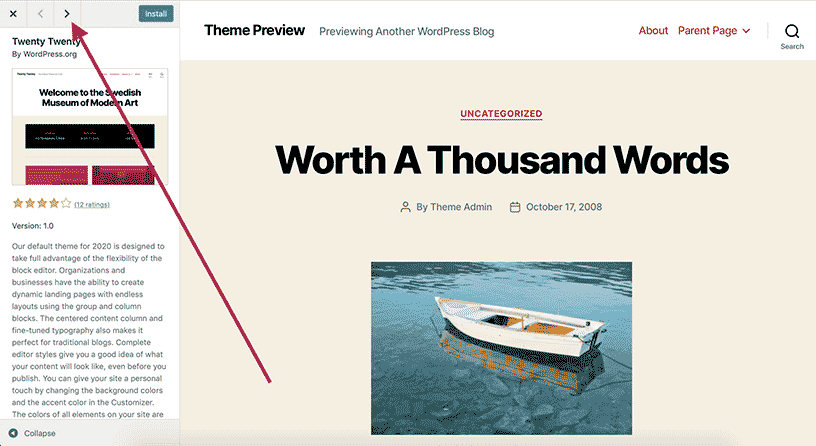
Then keep going through the themes until you find one you like.
If you’re looking for a SEO friendly theme, then you want a fast loading one.
Generally, it’ll say in the theme description if it’s optimized for SEO.
Also, themes that have a clean and simple design are great for SEO too.
So don’t pick a theme that has lots of flashy graphics as it’ll only slow your site down.
Because like I said before…
The slower the load time, the more it’s going to negatively affect your rankings.
Step 3. Setting up Legal and Contact Pages for your Site
What we need to do now is to setup your legal pages for your WordPress site.
This is important for a few reasons. These being:
-
- Google prefers legally compliant sites & ranks them higher as a result.
- You’re legally covering yourself in the process.
Of course, none of this is legal advice – you need to speak to a lawyer for that.
I’m just showing you how to setup these pages for better Google rankings.
Anyway, now you can see how important this is, here’s how to do it…
First, go to “Pages” then “Add New”:
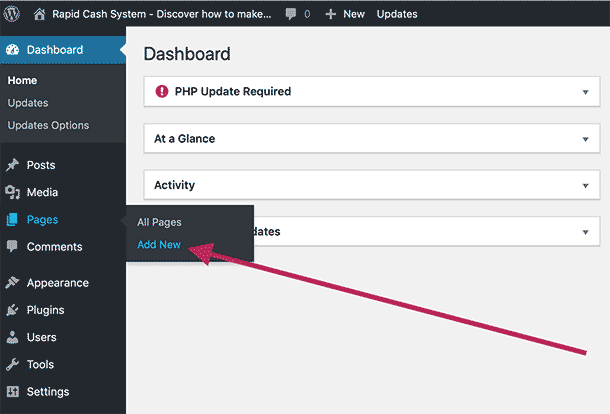
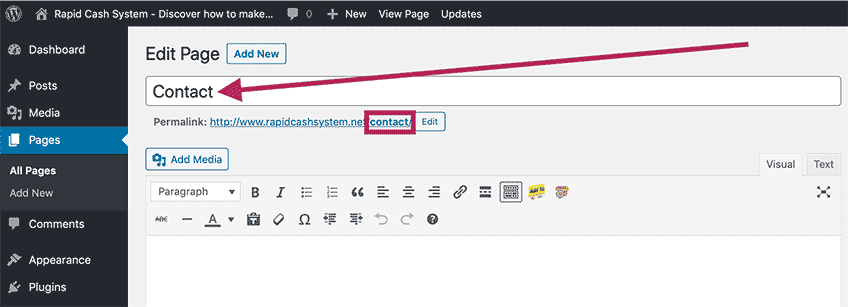
Now the first page we’re going to create is the “Contact” page.
For the headline, simply call it “Contact” and your Permalink should update too:
Then in the post body, just put a sentence or two how people can contact you.
So for example, you could put something like…
“If you have any questions or business enquiries, you can contact me at the following email address: [email protected]”
Here’s my contact page to give you an example:
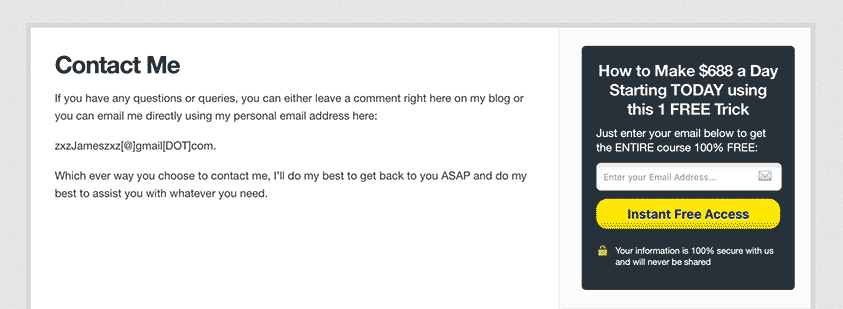
As you can see, it’s nothing fancy – just straight to the point on how to contact me.
Once you’ve done that, then click the “Publish” button.
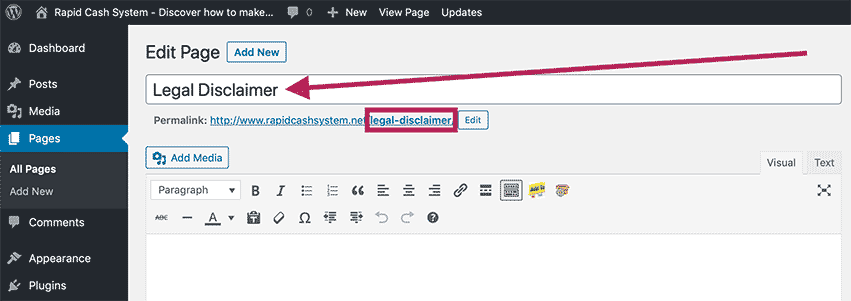
Next up is your Legal Disclaimer page.
So once again, you would create a new page & put “Legal Disclaimer” in the header like before:
What we need to do now is to post a legal disclaimer in the post body.
Thankfully, this is actually easier than you may think it is.
All you’ve got to do is do a Google search for websites that will generate a legal disclaimer.
So do a search for the following phrases:
-
- Free legal disclaimer generator
- Free Legal Disclaimer fill in the blanks form
…Or something along those lines.
You should find loads of sites that will auto generate a legal disclaimer for you.
All you do is fill in the blanks like your name etc & it’ll generate you a legal disclaimer.
Then simply paste the legal disclaimer into the body post like so:
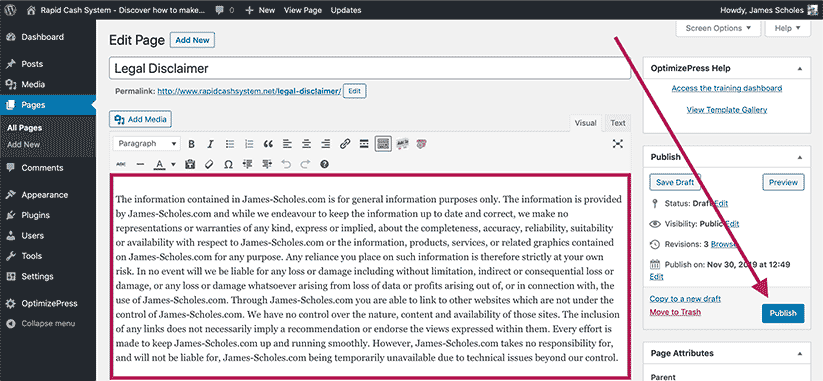
Once you’ve done that, then press “Publish” & we’ve completed our legal disclaimer page.
You would rinse & repeat this process for your Privacy Policy & Terms and Services pages too.
So create pages like we did above & find the corresponding sites to generate the forms.
So for your Privacy Policy page, you would do a search for the following phrases:
-
- Free privacy policy generator
- Free privacy policy fill in the blanks form
…And for your Terms & Services page, you would do a search for the following:
-
- Free Terms and Services generator
- Free Terms and Services fill in the blanks form
Once you’ve populated your legal pages, then you’re ready for the next step…
Step 4. How to Setup Menus in the Correct Manner
We now need to add your legal & contact pages to a menu on your site.
This will make them visible & easy to find if anyone wants to access them for whatever reason.
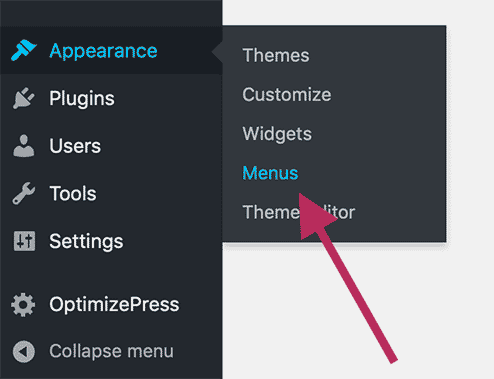
To do this, simply go to “Appearance” then “Menus”:
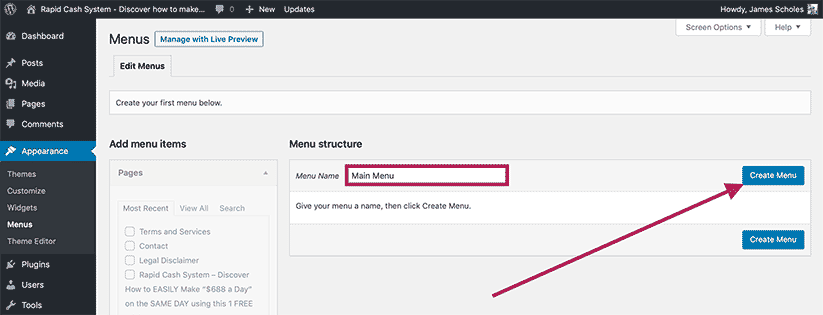
Then next to “Menu Name:” put the name for your menu and press “Create Menu”:
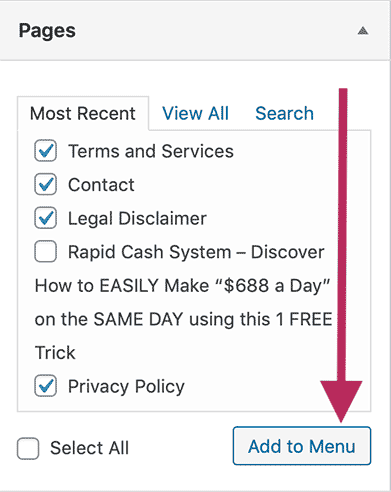
In the “Page” box, tick all the pages you’ve created then click “Add to Menu”:
Now your pages should appear in the “Menu Structure” section on the right:
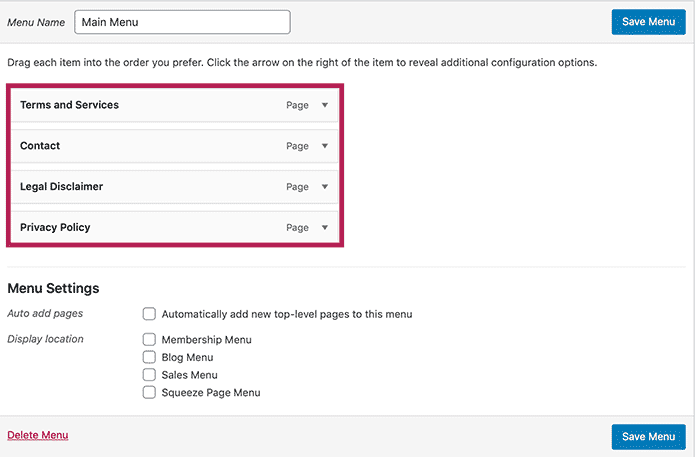
This is optional but you can rearrange the order by dragging and dropping them.
If you’re happy with the order, tick the “Bog Menu” then “Save Menu”:
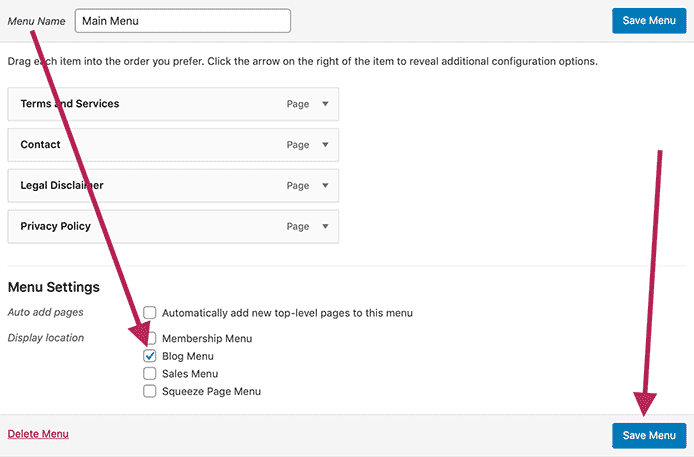
Now when you visit your site, you should see the legal pages at the top of your site.
Step 5. Downloading and Installing Free WordPress Plugins for SEO
What we need to do now is to download all the plugins we need for our website.
The good news is that all these plugins are 100% free to download and use.
These plugins will optimize your WordPress site for SEO and for other important aspects too.
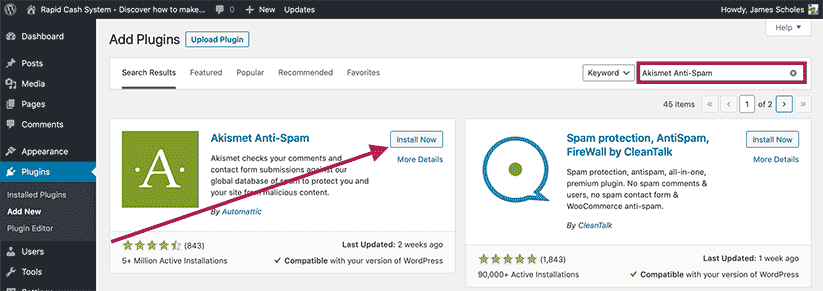
Anyway, to access these WordPress plugins, go to “Plugins” then Add New”:

Now I’m going to list the plugins we’ll be downloading for this part of the training.
So the plugins we’ll be downloading will be:
-
- Akismet Anti-Spam
- TinyMCE Advanced
- WP Product Review Lite
- Comment Reply Email Notification
- Yoast SEO
Copy one of the plugin names above & paste them in the search bar.
Then click “Install Now” and rinse and repeat with every other plugin:
Once you’ve installed all the plugins from the list above, we now need to activate them.
To do that, click on “Installed Plugins”:

Then activate all the plugins by clicking on the “Activate” link on every plugin:
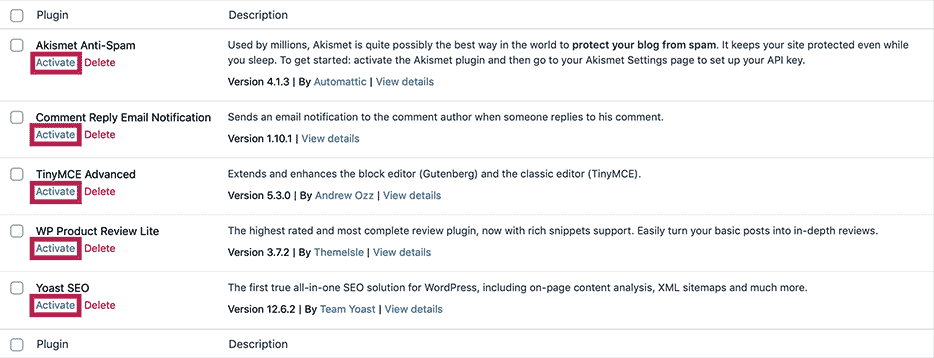
Once you’ve done that, we’re now ready for the next step…
Step 6. How to Setup Akismet and Optimize Yoast SEO Plugins for SEO
Now out of the five WordPress plugins, only two of them need to be optimized.
These being Akismet Anti-Spam and Yoast SEO plugins.
So with that said, here’s how to setup and optimize these WordPress plugins for SEO.
Akismet Anti-Spam WordPress Plugin
Head to the plugin section & either click “Settings” or the Akismet banner above:

Then click “Set up your Akismet account”:
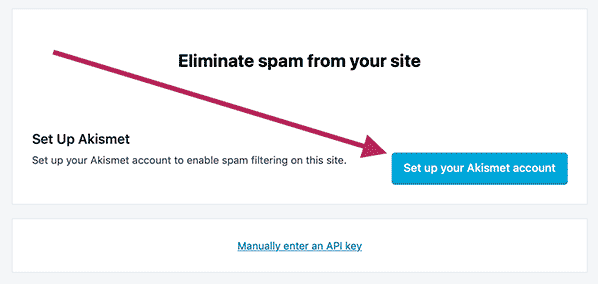
Now this will take you to the Akismet website.
To get Akismet free, choose the “Personal” plan & put the slider to 0:

Then enter your details & press “CONTINUE WITH PERSONAL SUBSCRIPTION”.
Akismet will then give you your own unique Akismet API key for your site.
All you do then is return back to your site & paste the API key within the Akismet settings.
Yoast SEO WordPress Plugin
Yoast SEO WordPress plugin is designed to optimize your entire site for SEO.
There’s quite a bit to do here but it’s definitely worth it.
Here’s how to optimize your website for SEO using the Yoast SEO plugin anyway…
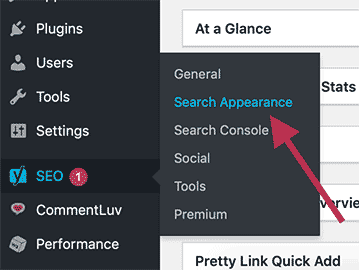
The first thing we need to do is to go to “SEO Yoast” then click “Search Appearance”:
Starting with the “General” tab, scroll down to “Homepage” section.
For “SEO title” I recommend to delete everything apart from “Site title”:

This will remove unwanted keywords from your title that could negatively affect your rankings.
Then for “Meta description” put a little blurb what your site in general is about:

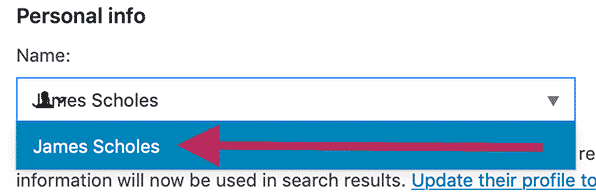
For “Choose whether the site represents an organization or a person”, select “Person”:

Then for “name”, click on the dropdown menu and click on your name:
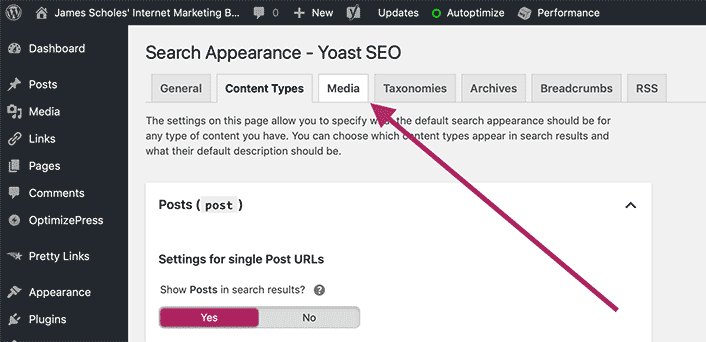
Once you’ve done that, then scroll to the top of the page & click the “Content Types” tab:

Now there’s two boxes we need to optimize for SEO – Post and Page boxes.
Here’s how to optimize them for optimal SEO performance…
Yoast SEO Settings: Posts
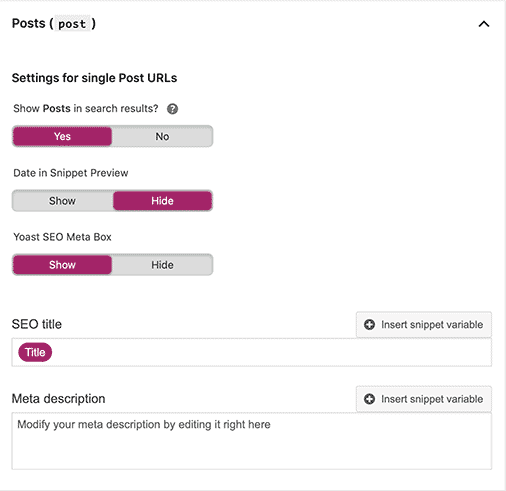
-
- Show Posts in search results: Yes
- Date in Snippet Preview: hide
- Yoast SEO Meta Box: Show
- SEO title: Title
- Meta description: Leave blank
Yoast SEO Settings: Pages

-
- Show Pages in search results: Yes
- Date in Snippet Preview: hide
- Yoast SEO Meta Box: Show
- SEO title: Title
- Meta description: Leave blank
Once you’ve optimized your posts and pages for SEO, then click the “Media” tab:
Set “Redirect attachment URLs to the attachment itself?” to “Yes”:

Now head back up to the top of the page and now click the “Taxonomies” tab
Here’s how to optimize the Taxonomies section for SEO…
Yoast SEO Settings: Categories
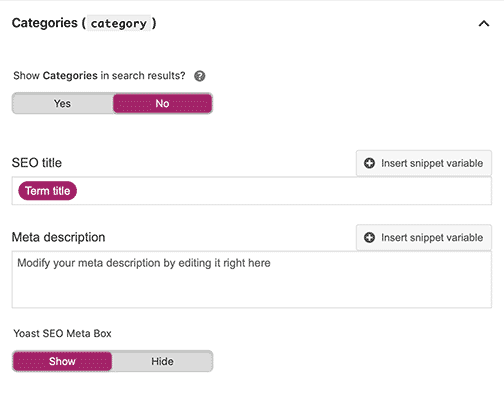
-
- Show Categories in search results: no
- SEO title: Term title
- Meta description: Leave blank
- Yoast SEO Meta Box: show
Yoast SEO Settings: Tags

-
- Show Tags in search results: no
- SEO title: Term title
- Meta description: Leave blank
- Yoast SEO Meta Box: show
Yoast SEO Settings: Format
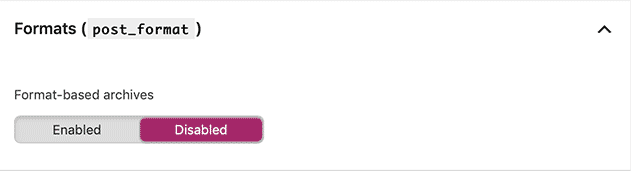
-
- Format-based archives: Disabled
Yoast SEO Settings: Category URLs
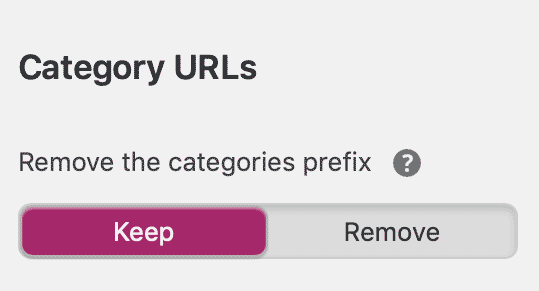
-
- Remove the category prefix: Keep
Once you’ve done that, then scroll to the top & click on the “Archive” tab.
Here’s how to optimize Archive setting for SEO…
Yoast SEO Settings: Author archives settings
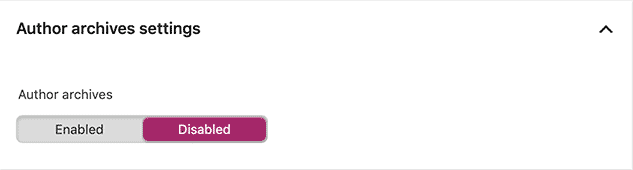
-
- Author archives: Disabled
Yoast SEO Settings: Date archives settings
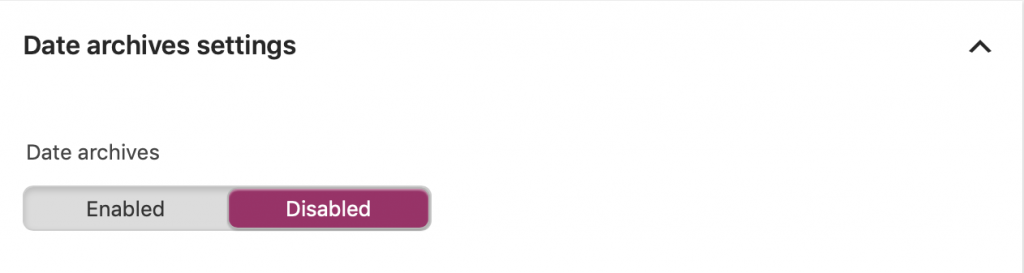
-
- Date archives: Disabled
Now head to the “Breadcrumbs” tab”
Yoast SEO Settings: Breadcrumbs settings
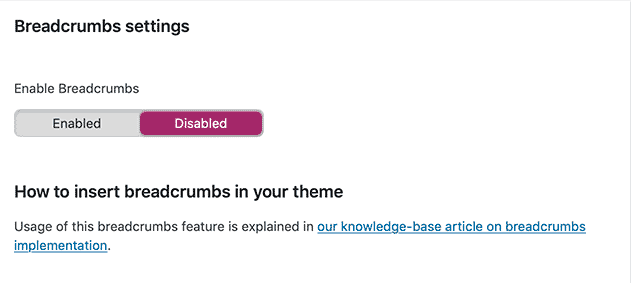
-
- Enabled Breadcrumbs: Disabled
Once we’ve optimized all of the settings for Yoast SEO, then click “Save Changes”.
Anyway, that’s how to optimize a WordPress website for SEO using Yoast SEO plugin.
You’re now ready for the next step…
Step 7. Naming your Site and Setting up a Free Gravatar Profile
The next thing we need to do is to name your site, then setup a Gravatar account.
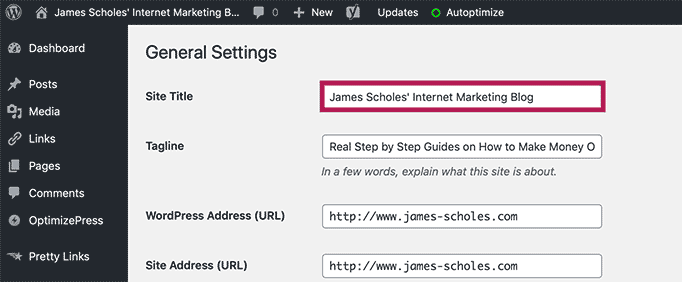
To name your site, simply head to “Settings” then “General”.
Then put your name of your site where it says “Site Title”:
Now you can call your WordPress site whatever you want…
If you’re struggling what to name your site, here’s a simple formula you can use…
Your Name + Market + Type of Site = Your Site’s Name
So for example, my site is called…
-
- James Scholes’ Internet Marketing Blog
Here’s a few more examples using this simple formula…
-
- Jill Valentine’s Dog Training Site
- Chris Redfield’s Diet and Excerise Blog
- Albert Wesker’s Yoga Lifestyle Club
- Barry Burton’s Health and Beauty Guides
What’s great about this formula is that it tells Google what your site’s about from the get-go.
Feel free to use this formula anyway – you can always change it later if you want.
Next up, is your “Tagline”:

Just something short & snappy to sum up what your site is all about.
Once you’ve done that, then click “Save Changes”.
We Now Need to Setup your Gravatar Account…
Just in case you’re wondering, Gravatar is basically your avatar you use to represent yourself.
Your Gravatar will also appear when you comment on people’s sites as well.
So it’s very important to pick a good picture of yourself as it’ll represent you and your brand.
To setup a Gravatar account, I would first recommend to see if you have one, already.
To do so, just hover your mouse over your name in the upper-right when in the Admin area:
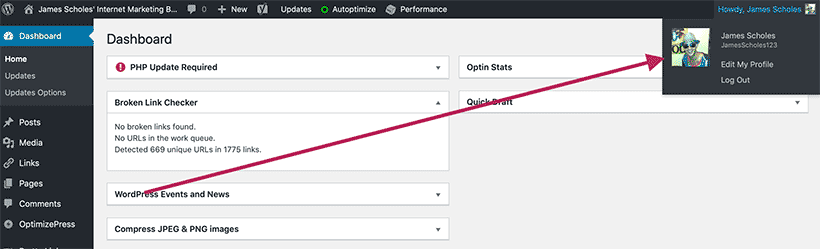
If you don’t see an image of yourself, then you haven’t got a Gravatar account.
To set one up, just click “Edit My Profile” in the dropdown menu you’ve opened.
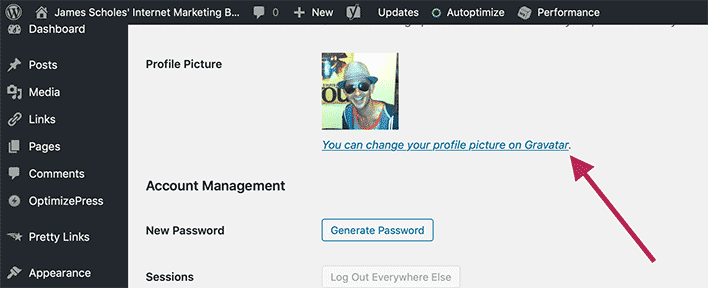
Scroll down until you get to “Profile Picture” section.
Then click the “You can change your profile picture on Gravatar.” link:
Then click on the “Create Your Own Gravatar” box:

From here, you’ll need to create a free WordPress account.
Then you’ll need to upload a profile picture to represent you.
Remember, this is not only appearing on your site, but other sites you comment on too.
So make sure to pick one that represents you in the best possible light.
Step 8. How to Add a Bio Box to your WordPress Site
The next thing we need to do is to setup a bio box for your WordPress site.
This is important as it’ll put a face to your content & humanise your site too.
It’ll also help people understand what your site is about when they first visit.
To setup a bio box, head to “Appearance” then “Widgets”.
Now locate the “Text” box and then click “Add”:
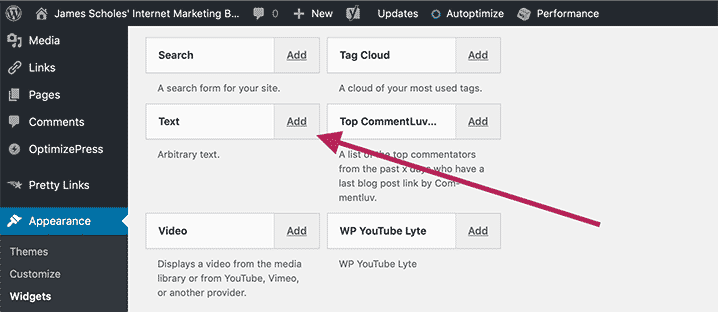
(Depending on the theme, you may have to drag & drop it in the Sidebar section instead)
Now you should see something that looks like this:
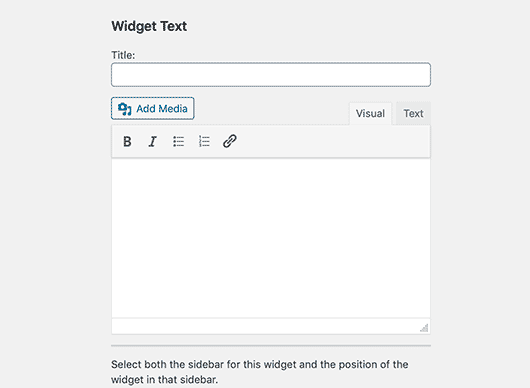
For the “Title” box, you can say something like…
-
- Welcome to [NAME OF SITE]
- Welcome to [DOMAIN]
- Thanks for stopping by…
- Hello There!
….Or something like that – just keep it short and snappy.
Next up, we need to add an image of you.
I recommend using the same image you used for your Gravatar account.
As in, something that makes you look friendly and approachable.
Remember, this will help to put a face to your content & humanise your site.
To do so, simply click on the “Add Media” button:

Now drag and drop the image you want to use into the center of the Media box.
Once you’ve done that, then click “Insert into post”.
What we need to do now is to write a brief description what to expect from your site.
To make it easier for you, I’ve wrote down 3 points you need to touch on in your bio,
These being…
-
- Welcome the visitor to your site
- Tell them what to expect from your site
- Ask your visitor to engage
Now This is Really Important…
When writing your bio, you want to keep it super concise.
If you drag it on too long, it’s going to full up your entire sidebar & no one’s going to read it.
So literally write a single sentence for each point & keep them concise too.
If you’re not sure how to write a good, yet concise bio, here’s an example…
Hey, my name is James Scholes & thanks for stopping by. I’ll be covering all things marketing related like all the latest news, sharing powerful strategies to boost your bottomline & reviewing all the latest products too. Hope you enjoy your stay & hit me up if you need anything.
If you want, you can use this one…
Just make sure to personalise it and change the keywords to suit your market though.
Once you’ve written your bio, then press “Save” & your bio should appear on your site.
Step 9. How to Connect your WordPress Site to Google Search Console
The next thing we need to do is to connect your site to Google Search Console.
Now there’s a few benefits to connecting your site to Google Search Console.
These being…
-
- It’ll allow you to get valuable data like what keywords you’re ranking for.
- Google Search Console will alert you if there’s any issues your site may have.
- You’ll be able to index your posts faster using Google’s built-in indexing tool.
So to connect your site to Google Search Console, head to their website:
https://search.google.com/search-console
Assuming you’ve got Google account, you should see this screen:
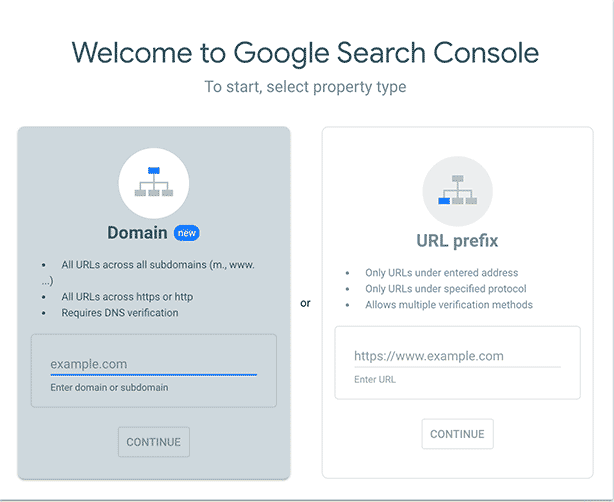
Now there’s two ways to verify your WordPress website with Google Search Console.
The best way to verify is through the “Domain” option.
However, this requires access to your DNS which some people may not have access to.
So I’ll show you how to do this through the second option, the “URL prefix” option.
Just keep in mind, you will have to verify your site 4 times for each prefix.
These are your 4 prefixes just in case you’re wondering:
-
- https://
- https://www.
- http://
- http://www.
You only have to set it up once then re-verify the other 3 prefixes anyway.
So starting with “https://”, enter the https:// version of your domain & click “Continue”:

Then click on the file to download it to your computer:
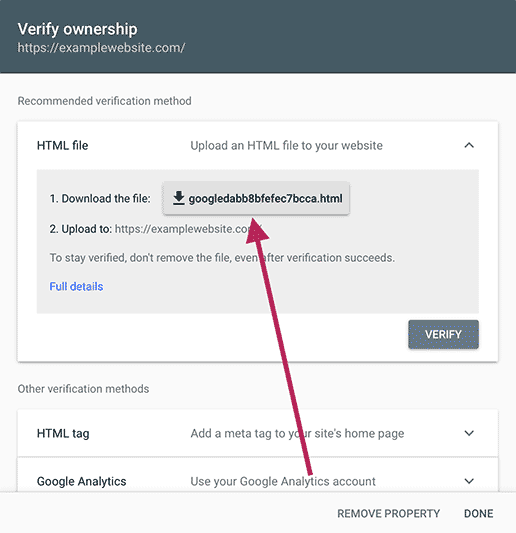
Then using a FTP program or through your Cpanel, you need to upload the file to your server.
It must be uploaded to the main file where your website is located by the way.
Once you’ve done that, then click “Verify”:

This should verify the “https://” version of your domain.
You now need to verify the other three prefixes as well.
This should be quicker to do as you can use the previous file we uploaded earlier to verify them.
And Another Thing…
What I recommend you to do is to choose one prefix you want to represent your site.
Make sure it’s a secure prefix too, so one of these prefixes you’ll need to choose:
-
- https://
- https://www.
The one you choose will be the main version you check stats & submit your sitemap to etc.
When you do this, Google will start to index that version of your site in their search results.
Anyway, once you’ve verified all four versions of your site, then you’re ready for the next step…
Step 10. How to Submit your Sitemap to Google Search Console
The final step in this training is to submit your sitemap to Google Search Console.
This will tell Google of all the pages and posts you want Google to index in their search engine.
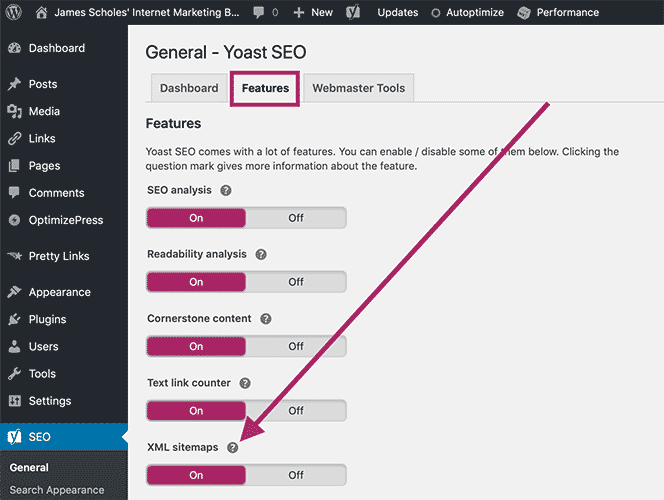
To do this, first head to “SEO Yoast” then “General” and click the “Features” tab.
Then scroll down until you get to “XML sitemaps”, click on the Question Mark then this link:
You then need to click “See the XML sitemap.” that as appeared.
This should take you to your WordPress sitemap.
If you’ve set it up correctly, you should see two links – your page and post links.
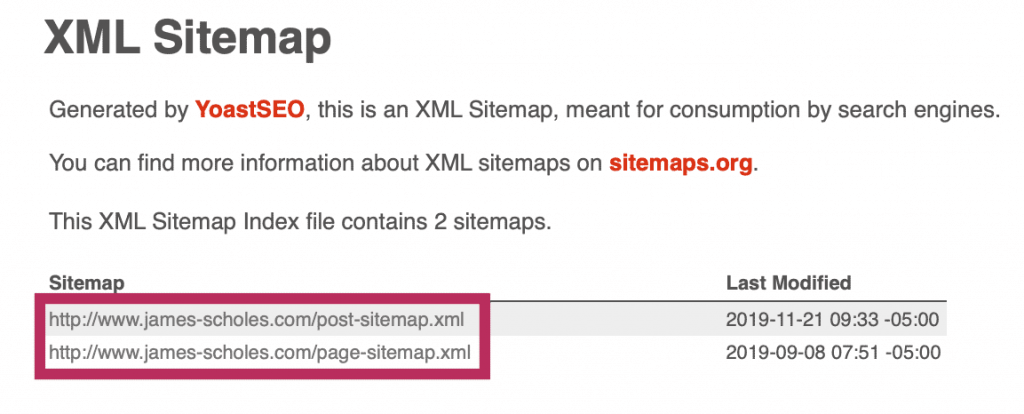
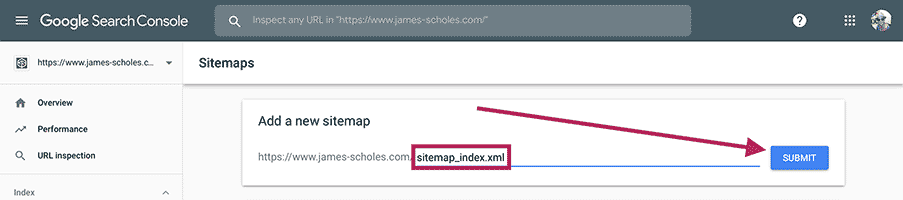
We now need to grab the URL extension of this page.
You can either copy it from the URL or just copy this instead:
-
- sitemap_index.xml
Then head back to Google Search Console:
https://search.google.com/search-console
Locate and click the “Sitemaps” tab in the sidebar:

Paste the “sitemap_index.xml” into the “Add a new sitemap” section & click “SUBMIT”:
You should now have successfully submitted your sitemap to Google Search Console.
You only need to do this once by the way…
This is because your sitemap will update automatically every time you publish a post.
Google will also check your sitemap for new updates every time they visit your site too.
…And That’s How to Optimize a WordPress Website for SEO using FREE methods
I hope you enjoyed today’s free training on how to optimize a WordPress website for SEO.
I know there’s a lot covered here but it’s definitely worth applying these SEO techniques.
In fact, you should see an increase in your Google rankings from all your posts after doing this.
But Believe It or Not, We’re Not Done with Optimizing Your WordPress Website for SEO Just Yet…
In the next part of this training series, I’m going to show you how to turbo-charge your site.
You can start the next part in this training series, right here:
Once you apply these methods, your site will load lightning fast.
Plus, Google will reward your fast loading site with higher rankings as well.
So if you want to get even better rankings, I’ll see you in the next part of this training series.
If you want to be notified when I post this, I recommend signing up to my newsletter.
You’ll also get access to a ton of free training on how to make a full time income online.
So it’s definitely worth signing up – especially if you want to know how to make money online.
If you’re interested, you can sign up, right here.
Anyway…
Have you got questions on how to optimize a WordPress website for SEO?
If so, drop ’em down below & I’ll answer any queries you may have regarding WordPress SEO.
Thanks for reading and I’ll see you in the next part of this training series 🙂
James Scholes

How to Optimize a WordPress Website for SEO & Boost Rankings INSTANTLY
10 Comments
gentlysallim
Thank you for this post, it really helped me out with setting up WordPress using Yoast and SEO.
James Scholes
You’re welcome, buddy… Glad I could help 🙂
James Scholes
isuamfon offiong
This is a great tutorial James. I saw it after 32 secs you posted it on Twitter. I am bookmarking it straight away.
However, do you think WPRocket is the super or a head shot tool for speed optimization because it seems pretty nice for most sites and my site as well?
James Scholes
Thanks, Isuamfon… Glad you liked it.
Regarding your question: I’ve heard of WPRocket but never used it so I can’t comment, unfortunately.
However, if WPRocket does the job of a few of these plugins and you use less plugins as a result, then yeah, feel free to use WPRocket instead.
Also, while you’re here, this guide is part of a bigger training series on how to make money using WordPress and SEO.
If you’re interested, you can checkout all the posts here:
https://www.james-scholes.com/how-to-make-money-with-a-wordpress-blog/
It literally walks you step by step throughout the entire process on how to make money online from start to finish.
So yeah, check that out if it’s something you think it’ll interest you.
Thanks for stopping by anyway – appreciate it 🙂
James Scholes
Esther
Hi James,
This guide is such a lifesaver. I just added the Akismet anti-spam plugin to my blog and it didn’t even take an extra time. Thank you so much for this post.
Meanwhile, I’m also looking for how to make my blog mobile-friendly. Google console kept showing “text too small” and I have not had any success finding any help on the internet.
Mind creating a post on that topic? Will really appreciate it!
Thank you
James Scholes
Hi Esther,
Thank you – glad you got value from this SEO/Wordpress guide.
Be sure to checkout the rest of this free training series if you haven’t done so already.
With the issue you’re having with Google Search Console: most of the time these are false positives.
So what you can do is login to Google Search Console and there should be a button you can press to get it reviewed.
9 times out of 10 the issue will be marked as validated and Google Search Console will longer see it as a problem.
Hope this helps and best of luck with it too 🙂
James Scholes
John Gurung
Great post about optimizing wordpress for SEO!
James Scholes
Thanks John, glad you liked this guide.
Just so you know, this is part of a bigger course which you can find here:
https://www.james-scholes.com/how-to-make-money-with-a-wordpress-blog
It’s completely free with no optin required and it’ll show you how to make money with affiliate marketing using SEO.
Hope this helps anyway.
Good luck,
James Scholes
Bright
Hey James, do you have a tutorial on RankMath? I used Yoast for a while, but at the moment there’s so much rave on RankMath’s instant indexing.
James Scholes
Hey Bright,
I’m afraid not.
I’ve only used Yoast but I’ll definitely checkout RankMath as the instant indexing sounds interesting.
James Scholes
Leave A Response