How to Install WordPress with Cpanel using Softaculous for Beginners
Welcome to the second part in this training series.
Today, I’m going to be showing you how to setup your domain and hosting.
Then you’ll see how to install WordPress with Cpanel using Softaculous for beginners too.
So if you’ve been following from the last training, you should have a SEO friendly domain.
One that will get you ranked quicker, easier and higher than a standard domain.
This means you’re now ready to setup your hosting & install WordPress with Softaculous.
So with that said, lets begin…
What You’ll Be Learning Today:
(Click any of the links below to jump to that part of the training)
Watch Training in Video Format
If you prefer to watch rather than reading, you can get this training in video format instead.
If so, you can watch it here:
![How to Setup Your Hosting & Auto Install WordPress in Cpanel using Softaculous [PART 2]](https://i.ytimg.com/vi/GlDWVf3QW0A/0.jpg)
Once you’ve completed this training, you can start the next module here:

However, if you prefer to read, then you can do so here…
Step 1. Getting your Domain and Hosting
Before we install WordPress, we first need to get your domain and hosting.
If you’ve already got hosting & it’s Cpanel enabled, then you can skip to the next step.
If, however, you don’t have any hosting, let me recommend the guys I’m with…
They’re called D9 Hosting and I’ve been with them since 2008.
It’s the best hosting I’ve used to date, hence why I’ve been with them for over a decade.
It’s definitely the most safest, secure and reliable service I’ve used anyway.
Plus, their support is top-notch too.
So if you’re struggling to find decent hosting, then check these guys out:
If you do go with D9 Hosting, I recommend their cheapest option, the “Web Hosting” package:
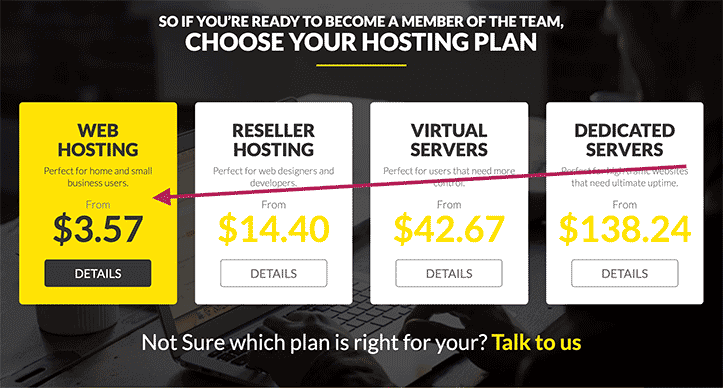
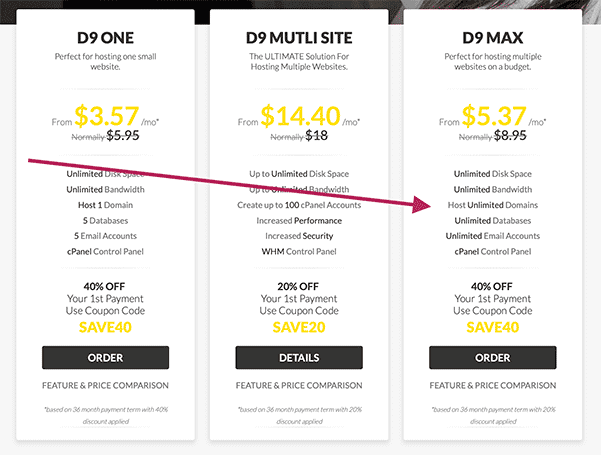
Now there’s three packages to choose from.
The one I recommend to go with is the “D9 Max” package:
This is everything you’ll need & you’ll never need to upgrade again either.
If, however, you’re on a tight budget, then go with the “D9 One” package instead.
Just keep in mind, the D9 One package has some limitations.
You should be fine initially, but you may have to upgrade later as your business grows.
Anyway…
Once you’ve chosen your package, you’ll be presented with a special offer:
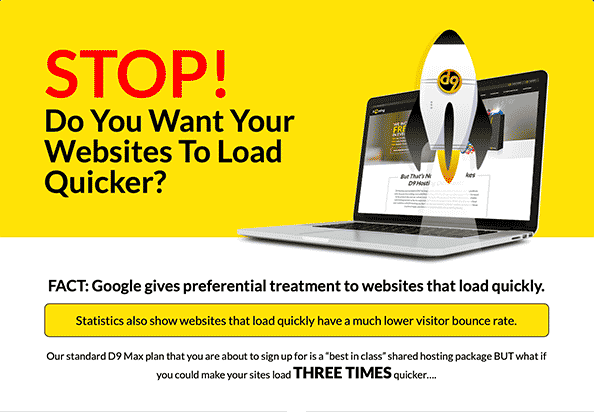
This is entirely optional but I would recommend it if you can afford it.
It’s only a few extra bucks a month & it’ll massively speed up your site’s load times.
This is important because Google now considers website load times as a ranking factor.
So if you want to get the best possible rank in Google, this will help you to achieve it.
Plus, you’ll give a better end-user experience which further boosts your rankings.
So if you can afford it, I would recommend it. but if you can’t, no worries.
Anyway…
On the next page, you need to enter the domain we researched in the last training.
So paste the high authority domain you’ve chosen to work with & press “Check”.
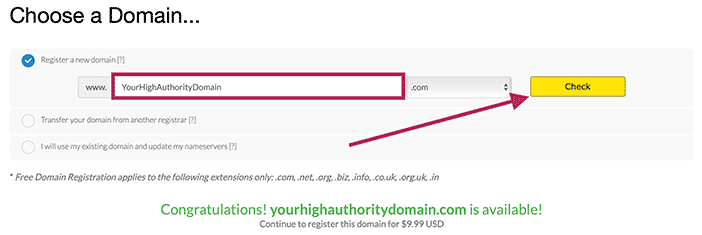
Once D9 has confirmed the domain is available, scroll to the bottom & press “Continue”:

You should be then taken to the Configure Page
Now there’s a few additional upgrades and offers presented on this page.
Most of them you won’t need but I’ll walk you through them so you understand everything.
Choose Billing Cycle

Here, you just choose how much you want to pay upfront.
Just keep in mind, the more you pay upfront, the bigger the discount you’ll get.
Server Location
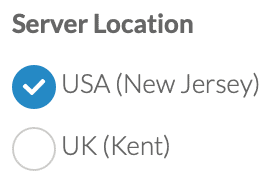
Ultimately, it really doesn’t matter which you choose as it’ll make hardly any difference.
However, if I had to choose one, I would have my site located on the US server.
This is because more of my customers come from the US than the UK.
But like I said, it’ll hardly make a difference in the scheme of things.
Still, it’s always nice to have a choice, I guess.
Cloud Spam Filter
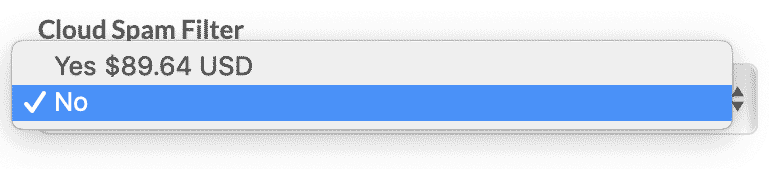
You can skip this as it’s not essential.
Dedicated IP Address (Recommended for SSL Certificates)

You don’t need this either so you can skip this one as well.
Hosted Exchange Enterprise Mailboxes
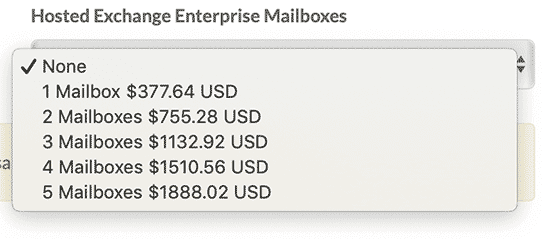
I’m not sure what this does, but either way, it’s not essential so skip it.
Once you’ve configured your choices, then press “Continue”.
You should be then redirected to the Domain Configuration page.
The only one I’d consider is the “ID Protection” option.
ID Protection will hide your personal details when someone does a Whois on your site.
So if you don’t want people to know your home address etc then tick this box:
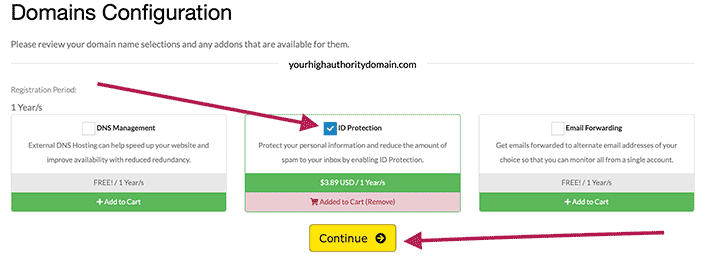
You can skip the other two as they’re not essential.
What you do then is review your purchase then checkout by entering your payment details.
Once payment is made, D9 Hosting will email your login details to you.
From there, you can login to your D9 Client Area and start the next step…
Step 2. How to Connect your Domain to your Nameservers
Right then, the first thing we need to do is to setup our Nameservers for our domain.
This is super easy to do and it should take a couple of minutes, tops.
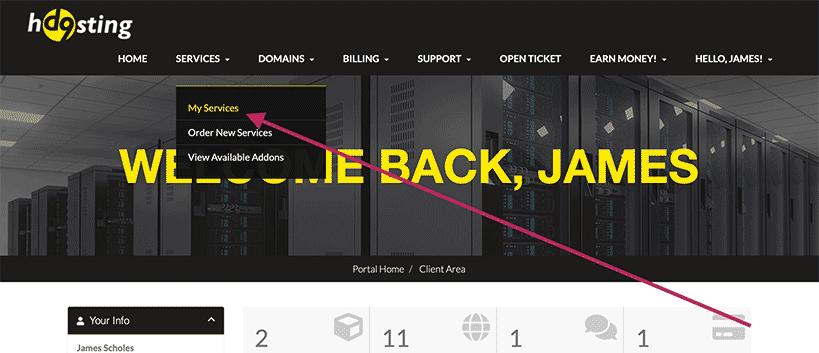
Starting in the D9 Client Area, hover over “Services” & click on “My Services”:
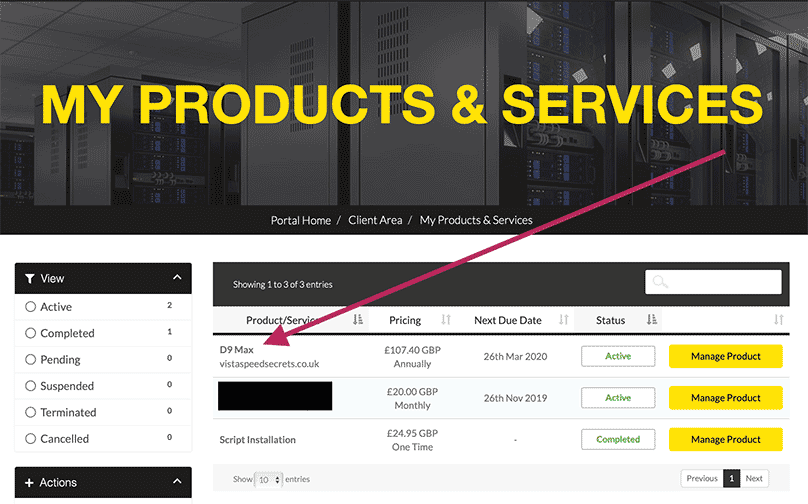
Then select the package you purchased from D9 Hosting:
Then scroll down until you come across the “Nameserver Details”:
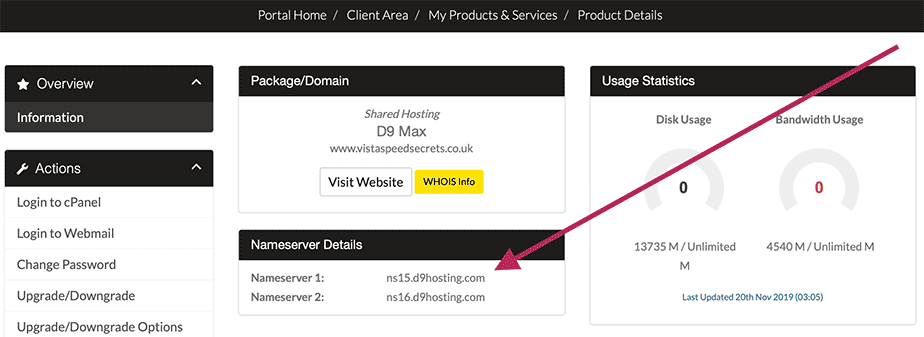
As you can see, this is where your nameservers are located.
What we need to do now is to take these nameservers details & copy them to Notepad.
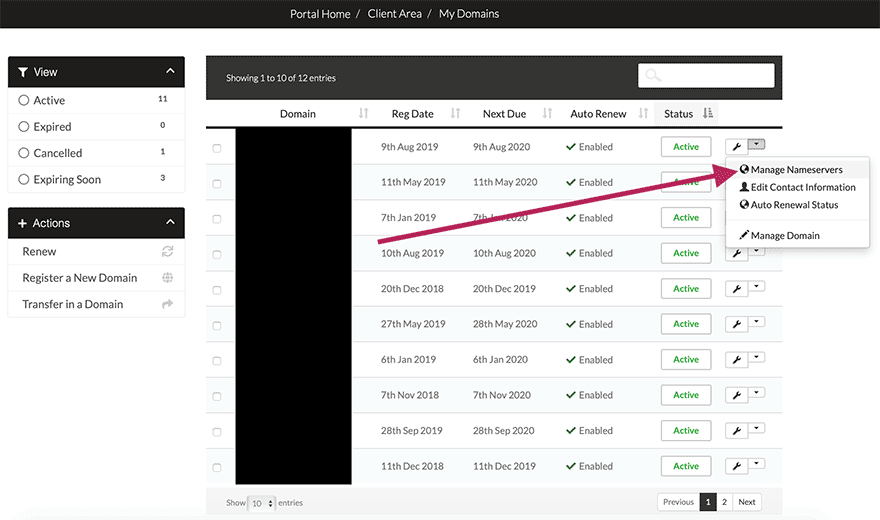
Once you’ve got your nameservers, we then hover over “Domains” then click “My Domains”:
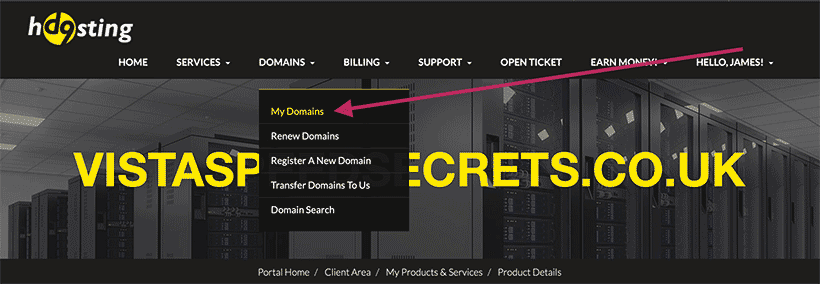
Then scroll down until you locate your domain, then select “Manage Nameservers”:
You now should see something like this:
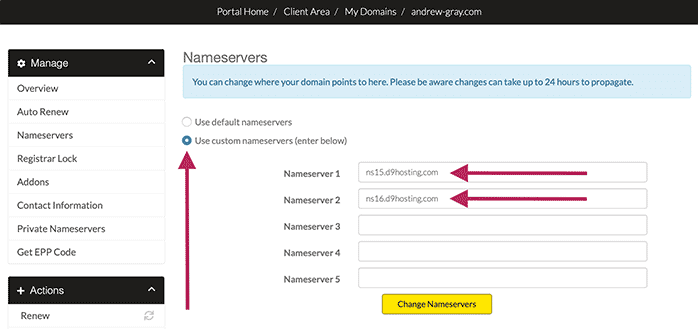
The first thing to do is make sure the “Use custom nameservers (enter below)” is selected.
Then paste nameserver 1 and 2 what you saved to Notepad in the corresponding boxes.
If there’s already nameservers in the boxes, just paste over them with the new nameservers.
Once you’ve done that, press “Change Nameservers” and we’re done.
Step 3. How to Setup a Addon Domain for your Website
The next thing we need to do is to setup a addon domain for your website.
To do this, we need to head to your Cpanel.
If you don’t know how to get to your Cpanel, then follow these instructions…
Starting in the D9 Client Area, hover over “Services” & click on “My Services”:
Then select the package you purchased from D9 Hosting:
Scroll down and on the left, you should see “Login to Cpanel”:
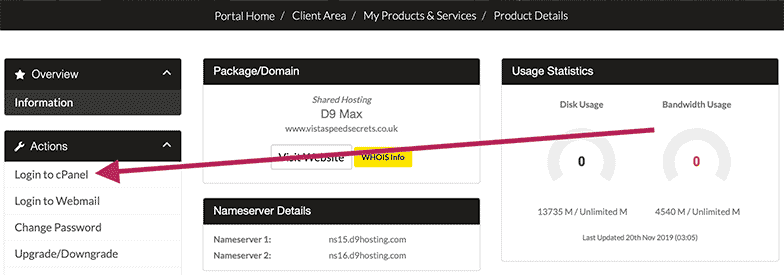
Simply click “Login to Cpanel” and this will take you to your Cpanel homepage.
Scroll down to to the “Domain” and click on “Addon Domains”:
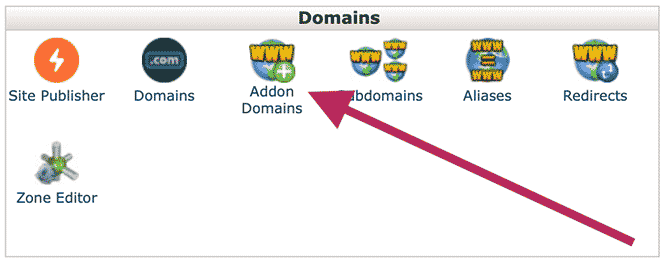
All you need to do is to enter your domain into the “New Domain Name”.
Then click on “Subdomain” box and it’ll auto generate the rest for you:
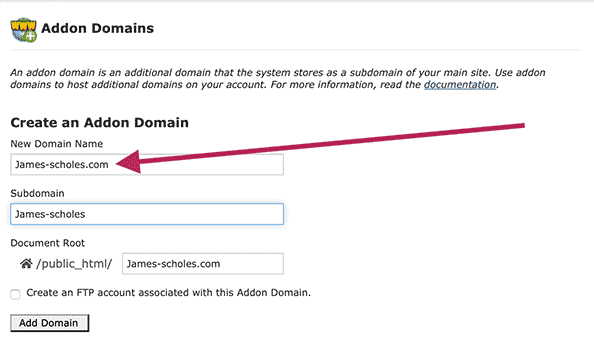
All you do then is press “Add Domain” & you’ve setup a addon domain for your domain.
Step 4. How to Install SSL Certificate for your Domain
Activating the SSL for our domain will encrypt all information for our website.
This in turn will secure our website & also help you get better rankings too.
Here’s how to do it anyway…
Starting from Cpanel, head to the “Security” box & click SSL/TLS:
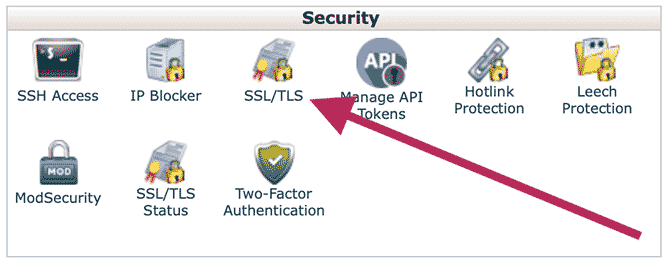
Then under “Install and Manage SSL for your site (HTTPS)” select “Manage SSL sites.”:
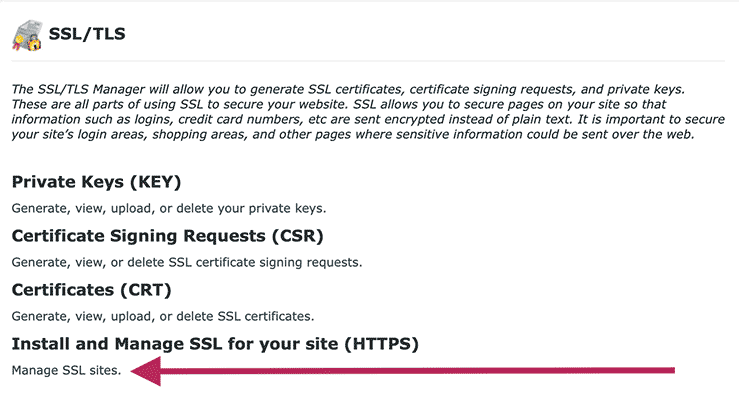
Scroll down until you get to the “Install an SSL Website”.
Then open the dropdown menu and select your domain:
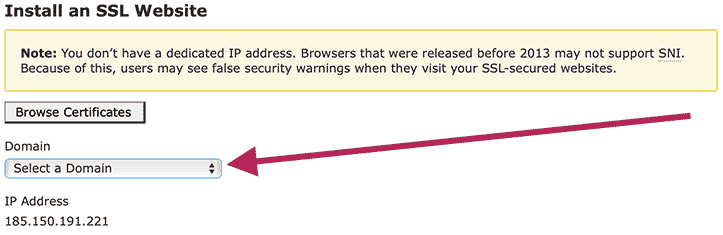
A button will appear called “Autofill by Domain” which you need to click.
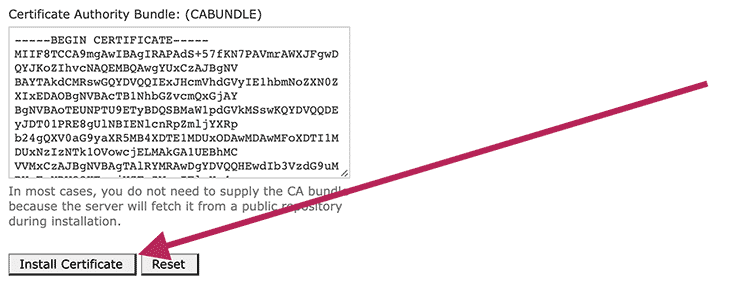
It’ll now generate a SSL certificate for your domain.
Now scroll to the bottom of the page & click “Install Certificate”:
Your domain is now secure and you’re now ready to move onto the next step…
Step 5. How to Install WordPress with Cpanel using Softaculous for Beginners
Right then, we’re on the final step of this part of the training series.
You are going to see how to install WordPress with Cpanel using Softaculous for beginners.
Like everything else in this training, it’s easy to do and it should only take a few minutes.
Here’s how to do it anyway…
Starting from Cpanel, find the “Softaculous Apps Installer” box & click on this icon:

Then locate the WordPress symbol, hover your mouse over it & click “Install” button:

Now there’s quite a few things we need to cover on this page.
So I’m going to break everything down into smaller parts so it’s easier to understand.
Software Setup

Choose the version you want to install: always select the latest version.
So in my case, it’s version 5.3, but you choose a later version if it’s available.
Choose Installation URL: select “https://” as we’ve activated our SLL certificate.
Then select the domain from the dropdown menu you want to install WordPress on.
Leave “In Directory” empty if you want your WordPress site to appear on your homepage.
Site Settings

Site Name: choose the name of your site.
Site Description: put a brief description or a tagline what your site is about.
Keep in mind you can change the site’s name & description later if you want.
So don’t worry if you can’t think of anything right now.
Enable Multisite (WPMU): leave this unticked as we’re only using one site.
Admin Account

Admin Username: a name you want to be known for on your site.
Admin Password: enter your hard-to-guess password here.
You can press the key symbol to generate random passwords if you want:

Also, make sure to save your password as you’ll need it later to login to your site
Admin Email: enter the email you want to receive all the notifications for this site.
Choose Language

Select Language: choose your native language.
Select Plugin(s)

Limit Login Attempts (Loginizer): tick this to limit the amount of incorrect login attempts.
This is great to stop hackers who “brute force” their way into your WordPress site.
You can always deactivate it later if you want it but I’d keep it activated, personally.
Classic Editor: this is great if you’re used to the old editor like I am.
If you’re not sure, tick it and try it out to see if you like the old version.
If not, you can always deactivate it and go back to the new Gutenberg editor.
wpCentral – Manage Multiple WordPress: skip this if you’re only managing 1 site.
Advanced Options

Database Name: I recommend not to touch this and leave it as it is.
Table Prefix: once again, I wouldn’t touch this and also keep this the same too.
Disable Update Notifications Emails: tick this if you don’t want to receive updates via email.
Auto Upgrade: tick “Upgrade to any latest version available (Major as well as Minor)”
Auto Upgrade WordPress Plugins: tick this so all your plugins update automatically.
Auto Upgrade WordPress Themes: tick this so all your themes update automatically.
Backup Location: I recommend to leave this to “Default” setting.
Select Theme

This is where you choose the theme you want to use with your WordPress site.
Just in case you’re wondering, a theme dictates what your site will look like.
Don’t worry if you can’t find one you like right now, you can always change it later.
If you want to see what the theme looks like, hover your mouse over it click on “Demo”:

Once you’ve found a WordPress theme you like, click the blue “Select” button below it.
Then enter your email and click on “Install”:

Softaculous will then email your login details for your new WordPress site.
If you can’t find the email, check your spam as it can end up there sometimes.
Once you’ve got your email, you can finally login to your new WordPress website.
Anyway, that’s how to install WordPress using Cpanel with Softaculous for Beginners
In the next part of the training, you’ll learn how to optimize a WordPress website for SEO.
You can start the next module by clicking on the following button:
We’ll also be tweaking WordPress for optimal SEO performance too.
So when it comes to ranking, you should get the highest ranking from the get-go.
If you’ve got any questions, feel free to drop them down below in the comments.
I’m here to help you get the results you’re after, remember 🙂
Until next time,
James Scholes

- how to install wordpress using softaculous
- cpanel training
- install wordpress addon domain cpanel
- cpanel wordpress
- softaculous install
- crazy domains ssl certificate
How to Install WordPress with Cpanel using Softaculous for Beginners
6 Comments
Saeed
Hi James,
Thanks a lot for providing this valuable information.
I’ve followed the instructions in the first lesson and found a few GREAT domain names.
My question is, how do I host the domain names that I found in my existing hosting account part from the one that you recommended in this article?
I own hosting accounts both at NameCheap.com & HostGator.com and I would like to use one of them.
I look forward to hearing from you soon.
Regards,
Saeed
James Scholes
Hey Saeed, nice to meet you.
First up, really glad you’re diggin’ this free training – appreciate it.
Regarding your question: most of what I teach in this post can be applied to your hosting account.
Also, all the Cpanel stuff I teach on this page can be used on HostGator.com hosting too.
The only one that’s going to be different for you is this step:
“Step 2. How to Connect your Domain to your Nameservers”
What you’ll need to do here is to contact NameCheap.com and they’ll assist you with it
I can’t tell you how to do it because I’ve never used NameCheap, you see.
Another thing you can do is to do a Google search for something like “How to Connect your Domain to your Nameservers in NameCheap” and see if there’s any guides online on how to do it.
But like I said, everything else should be the same or very similar as I show you how to use Cpanel which is the industry standard and most hosting companies use Cpanel.
Hope helps anyway, Saeed 🙂
James Scholes
Saeed
Hi James,
It’s me again, Saeed.
Do I have to register the expired domain name that I found with a domain name registrar?
James Scholes
Hey Saeed,
Yes, you want to pick the best domain you found and register it.
If you’ve build up a list of domains, I would keep them as you may need them later on in this free training series.
Good luck with it anyway, buddy 🙂
James Scholes
Saeed
Hi James,
Thanks a lot for your reply.
Sure, I found lots of domain names yesterday using the process that you outlined in your free course.
I’m about to register one of the domains and install a wordpress site on it.
I’ll keep you updated on that.
Thank you, James.
James Scholes
You’re welcome, Saeed.
And yeah, keep me posted and drop any questions you may have on the corresponding post and I’ll be happy to answer any questions for you.
Good luck,
James Scholes
Leave A Response